分类 数据库 下的文章

安装

Windows

mysql 5.7.40

  1. 创建my.ini

    [mysql]
    default_character_set=utf8mb4
    
    [mysqld]
    port=3306
    basedir=D:/usr/local/mysql/
    datadir=D:/usr/local/mysql/data
    max_connections=200
    character_set_server=utf8mb4
    default_storage_engine=INNODB
    lower_case_table_names=1
    default_time_zone='+8:00'
  2. 初始化数据库

    D:\>cd D:\usr\local\mysql\bin
    D:\usr\local\mysql\bin>mysqld --initialize --user=mysql --console --explicit_defaults_for_timestamp
    2025-06-20T13:25:08.995251Z 0 [Warning] InnoDB: New log files created, LSN=45790
    2025-06-20T13:25:09.081107Z 0 [Warning] InnoDB: Creating foreign key constraint system tables.
    2025-06-20T13:25:09.175719Z 0 [Warning] No existing UUID has been found, so we assume that this is the first time that this server has been started. Generating a new UUID: fcb9b279-4dd9-11f0-bcff-3c970e3c7ec6.
    2025-06-20T13:25:09.197778Z 0 [Warning] Gtid table is not ready to be used. Table 'mysql.gtid_executed' cannot be opened.
    2025-06-20T13:25:10.723739Z 0 [Warning] A deprecated TLS version TLSv1 is enabled. Please use TLSv1.2 or higher.
    2025-06-20T13:25:10.727148Z 0 [Warning] A deprecated TLS version TLSv1.1 is enabled. Please use TLSv1.2 or higher.
    2025-06-20T13:25:10.730535Z 0 [Warning] CA certificate ca.pem is self signed.
    2025-06-20T13:25:10.937104Z 1 [Note] A temporary password is generated for root@localhost: if<d/xGoY6#?

    if<d/xGoY6#?为自动生成的root密码。

  3. 注册服务

    D:\usr\local\mysql\bin>mysqld --install MySQL --defaults-file="D:\usr\local\mysql\my.ini"
    Service successfully installed.
  4. 启动服务

    D:\usr\local\mysql\bin>net start mysql
  5. 删除服务

    D:\usr\local\mysql\bin>net stop mysql
    D:\usr\local\mysql\bin>mysqld --remove MySQL

mysql 8.0

  1. 创建my.ini

    [mysql]
    default_character_set=utf8mb4
    
    [mysqld]
    port=3306
    basedir=D:/usr/local/mysql/
    datadir=D:/usr/local/mysql/data
    max_connections=200
    character_set_server=utf8mb4
    default_storage_engine=INNODB
    lower_case_table_names=1
    default_time_zone='+8:00'
    
    server_id=1
    log_bin=D:/usr/local/mysql/log/bin
    log_bin_index=D:/usr/local/mysql/log/bin.index
    expire_logs_days=7
    binlog_format=ROW
    #binlog_do_db=mysql
    #binlog_ignore_db=mysql
    max_binlog_size=100M
    binlog_cache_size=4M
    max_binlog_cache_size=512M
    
    plugin_load_add=validate_password.dll

    plugin_load_add=validate_password.dll开启密码策略管理。

    查看密码策略是否生效:

    mysql> show variables like 'validate%';
  2. 初始化数据库

    D:\usr\local\mysql\bin>mysqld --initialize --user=mysql --console
    2025-06-20T14:42:31.134143Z 0 [System] [MY-013169] [Server] D:\usr\local\mysql\bin\mysqld.exe (mysqld 8.0.31) initializing of server in progress as process 6016
    2025-06-20T14:42:31.169182Z 1 [System] [MY-013576] [InnoDB] InnoDB initialization has started.
    2025-06-20T14:42:32.051844Z 1 [System] [MY-013577] [InnoDB] InnoDB initialization has ended.
    2025-06-20T14:42:32.690248Z 0 [Warning] [MY-013501] [Server] Ignoring --plugin-load[_add] list as the server is running with --initialize(-insecure).
    2025-06-20T14:42:35.467199Z 6 [Note] [MY-010454] [Server] A temporary password is generated for root@localhost: 9lc?BR72%c?L
  3. 注册服务

    D:\usr\local\mysql\bin>mysqld install MySQL
  4. 启动服务

    D:\usr\local\mysql\bin>net start MySQL

CentOS 7.9

mysql 5.6.37

  1. 安装mysql

    [root@ecs ~]# sed -i "s/SELINUX=enforcing/SELINUX=disabled/g" /etc/selinux/config
    [root@ecs ~]# setenforce 0
    [root@ecs ~]# groupadd mysql
    [root@ecs ~]# useradd -s /sbin/nologin -g mysql -M mysql
    [root@ecs ~]# tar -zxvf mysql-5.6.37-linux-glibc2.12-x86_64.tar.gz
    [root@ecs ~]# mv mysql-5.6.37-linux-glibc2.12-x86_64 /usr/local/mysql
    [root@ecs ~]# chown -R mysql:mysql /usr/local/mysql
    [root@ecs ~]# chmod -R 770 /usr/local/mysql
    [root@ecs ~]# chmod -R 777 /tmp
    [root@ecs ~]# yum install -y 'perl(Data::Dumper)' libaio-devel
    [root@ecs ~]# /usr/local/mysql/scripts/mysql_install_db \
    --basedir=/usr/local/mysql \
    --datadir=/usr/local/mysql/data \
    --user=mysql
    [root@ecs ~]# cp /usr/local/mysql/support-files/mysql.server /etc/init.d/mysql
    [root@ecs ~]# sed -i "/^basedir=/cbasedir=/usr/local/mysql/" /etc/init.d/mysql
    [root@ecs ~]# sed -i "/^datadir=/cdatadir=/usr/local/mysql/data" /etc/init.d/mysql
    [root@ecs ~]# cp -f /usr/local/mysql/support-files/my-default.cnf /etc/my.cnf
    [root@ecs ~]# cat >> /etc/my.cnf << EOF
    user=mysql
    lower_case_table_names=1
    EOF
    [root@ecs ~]# chkconfig mysql on
    [root@ecs ~]# service mysql start
  2. 修改密码

    [root@ecs ~]# [root@ecs ~]# /usr/local/mysql/bin/mysql -uroot \
    -e "grant all privileges on *.* to 'root'@'localhost' identified by 'changeme' with grant option;flush privileges;"
  3. 放行端口

    [root@ecs ~]# firewall-cmd --permanent --zone=public --add-port=3306/tcp
    [root@ecs ~]# firewall-cmd --reload

mysql 5.7.31

  1. 安装mysql

    [root@ecs ~]# sed -i "s/SELINUX=enforcing/SELINUX=disabled/g" /etc/selinux/config
    [root@ecs ~]# setenforce 0
    [root@ecs ~]# groupadd mysql
    [root@ecs ~]# useradd -s /sbin/nologin -g mysql -M mysql
    [root@ecs ~]# cd /usr/local/src
    [root@ecs ~]# wget -c https://dev.mysql.com/get/Downloads/MySQL-5.7/mysql-5.7.31-linux-glibc2.12-x86_64.tar.gz -P /usr/local/src --progress=bar
    [root@ecs ~]# tar -zxvf mysql-5.7.31-linux-glibc2.12-x86_64.tar.gz
    [root@ecs ~]# mv mysql-5.7.31-linux-glibc2.12-x86_64 /usr/local/mysql
    [root@ecs ~]# mkdir -p /usr/local/mysql/log
    [root@ecs ~]# chown -R mysql:mysql /usr/local/mysql
    [root@ecs ~]# chmod -R 770 /usr/local/mysql
    [root@ecs ~]# chmod -R 777 /tmp
    [root@ecs ~]# yum install -y libaio-devel
    [root@ecs ~]# /usr/local/mysql/bin/mysqld \
    --initialize-insecure \
    --user=mysql \
    --basedir=/usr/local/mysql \
    --datadir=/usr/local/mysql/data \
    --explicit_defaults_for_timestamp=1
    [root@ecs ~]# cp /usr/local/mysql/support-files/mysql.server /etc/init.d/mysqld
    [root@ecs ~]# sed -i "/^basedir=/cbasedir=/usr/local/mysql" /etc/init.d/mysqld
    [root@ecs ~]# sed -i "/^datadir=/cdatadir=/usr/local/mysql/data" /etc/init.d/mysqld
    [root@ecs ~]# sed -i "/^datadir=/cdatadir=/usr/local/mysql/data" /etc/my.cnf
    [root@ecs ~]# sed -i "/^socket=/csocket=/tmp/mysql.sock" /etc/my.cnf
    [root@ecs ~]# sed -i "/^log-error=/clog-error=/usr/local/mysql/data/mysql.err" /etc/my.cnf
    [root@ecs ~]# sed -i "/^pid-file=/cpid-file=/usr/local/mysql/data/mysql.pid" /etc/my.cnf
    [root@ecs ~]# sed -i "/^\[mysqld\]$/a\lower_case_table_names=1" /etc/my.cnf
    [root@ecs ~]# systemctl enable --now mysqld
  2. 放行端口

    [root@ecs ~]# firewall-cmd --zone=public --add-port=3306/tcp --permanent
    [root@ecs ~]# firewall-cmd --reload

mysql 8.0.19源码安装

  1. 创建my.cnf

    [root@ecs ~]# cat > /etc/my.cnf << EOF
    [mysql]
    default-character-set=utf8mb4
    
    [mysqld]
    socket=/tmp/mysql.sock
    port=3306
    basedir=/usr/local/mysql
    datadir=/usr/local/mysql/data
    max_connections=200
    character_set_server=utf8mb4
    default_storage_engine=INNODB
    lower_case_table_names=1
    log_timestamps=SYSTEM
    default_time_zone='+8:00'
    default_authentication_plugin=mysql_native_password
    
    server_id=1
    log_bin=/usr/local/mysql/log/bin
    log_bin_index=/usr/local/mysql/log/bin.index
    
    [mysqld_safe]
    log_error=/usr/local/mysql/data/mysql.log
    pid_file=/usr/local/mysql/data/mysql.pid
    EOF
  2. 安装mysql

    [root@ecs ~]# sed -i "s/SELINUX=enforcing/SELINUX=disabled/g" /etc/selinux/config
    [root@ecs ~]# setenforce 0
    [root@ecs ~]# groupadd mysql
    [root@ecs ~]# useradd -s /sbin/nologin -g mysql -M mysql
    [root@ecs ~]# tar -Jxvf mysql-8.0.19-linux-glibc2.12-x86_64.tar.xz
    [root@ecs ~]# mv mysql-8.0.19-linux-glibc2.12-x86_64 /usr/local/mysql
    [root@ecs ~]# mkdir -p /usr/local/mysql/log
    [root@ecs ~]# chown -R mysql:mysql /usr/local/mysql
    [root@ecs ~]# chmod -R 770 /usr/local/mysql
    [root@ecs ~]# chmod -R 777 /tmp
    [root@ecs ~]# yum install -y libaio-devel
    [root@ecs ~]# /usr/local/mysql/bin/mysqld \
    --defaults-file=/etc/my.cnf \
    --basedir=/usr/local/mysql \
    --datadir=/usr/local/mysql/data \
    --user=mysql --initialize-insecure
    [root@ecs ~]# cp /usr/local/mysql/support-files/mysql.server /etc/init.d/mysqld
    [root@ecs ~]# systemctl enable --now mysqld
    [root@ecs ~]# firewall-cmd --zone=public --add-port=3306/tcp --permanent
    [root@ecs ~]# firewall-cmd --reload

    --initialize-insecure初始化空密码,否则会生成随机密码。

mysql 8.0.19 rpm安装

  1. 安装mysql

    [root@ecs ~]# tar -xvf mysql-8.0.19-1.el7.x86_64.rpm-bundle.tar
    [root@ecs ~]# rpm -ivh mysql-community-common-8.0.19-1.el7.x86_64.rpm
    [root@ecs ~]# yum remove -y mysql-libs
    [root@ecs ~]# rpm -ivh mysql-community-libs-8.0.19-1.el7.x86_64.rpm
    [root@ecs ~]# rpm -ivh mysql-community-client-8.0.19-1.el7.x86_64.rpm
    [root@ecs ~]# yum install -y libaio-devel
    [root@ecs ~]# rpm -ivh mysql-community-server-8.0.19-1.el7.x86_64.rpm
    [root@ecs ~]# rpm -qa | grep mysql
    [root@ecs ~]# mysqld --initialize
    [root@ecs ~]# chown -R mysql:mysql /var/lib/mysql
    [root@ecs ~]# systemctl start mysqld.service
    [root@ecs ~]# systemctl enable mysqld
  2. 查看初始密码

    [root@ecs ~]# cat /var/log/mysqld.log | grep password

Docker

mysql 5.6

  1. 创建配置文件

    [root@ecs ~]# mkdir -p /data/mysql/{data,etc}
    [root@ecs ~]# cat > data/mysql/etc/my.cnf << EOF
    [mysqld]
    lower_case_table_names=1
    basedir=/usr/
    datadir=/var/lib/mysql/
    socket=/tmp/mysql.sock
    character_set_server=utf8mb4
    collation_server=utf8mb4_general_ci
    sql_mode=ONLY_FULL_GROUP_BY,NO_ZERO_IN_DATE,NO_ZERO_DATE,ERROR_FOR_DIVISION_BY_ZERO,NO_AUTO_CREATE_USER,NO_ENGINE_SUBSTITUTION
    
    [mysql]
    default-character-set=utf8mb4
    EOF
  2. 创建容器

    [root@ecs ~]# docker run -d --name mysql \
    --privileged=true \
    -e MYSQL_ROOT_PASSWORD=root \
    -e MYSQL_DATABASE=maisi_db \
    -e MYSQL_USER=maisi \
    -e MYSQL_PASSWORD=123456789 \
    -p 3306:3306 \
    -v /data/mysql/etc/my.cnf:/etc/my.cnf \
    -v /data/mysql/data:/var/lib/mysql \
    maisi/mysql:5.7
  3. 登录测试

    [root@ecs ~]# docker exec -it mysql mysql -u root -p

mysql 8.0

  1. 创建配置文件

    [root@ecs ~]# mkdir -p /data/mysql/{data,etc}
    [root@ecs ~]# cat > /data/mysql/etc/my.cnf << EOF
    [mysql]
    default-character-set=utf8mb4
    
    [mysqld]
    lower_case_table_names=1
    basedir=/usr/
    datadir=/var/lib/mysql/
    socket=/tmp/mysql.sock
    default_authentication_plugin=mysql_native_password
    EOF
  2. 创建容器

    [root@ecs ~]# docker run -d --name mysql \
    -e MYSQL_ROOT_PASSWORD=root \
    -p 3306:3306 \
    -v /data/mysql/etc/my.cnf:/etc/my.cnf \
    -v /data/mysql/data:/var/lib/mysql \
    maisi/mysql:8.0
  3. 查看版本

    [root@ecs ~]# docker exec -it mysql mysql --version
    mysql  Ver 8.0.42 for Linux on x86_64 (MySQL Community Server - GPL)
    [root@ecs ~]# docker exec -it mysql mysql -uroot -p -e "select version();"
    +-----------+
    | version() |
    +-----------+
    | 8.0.42    |
    +-----------+

Ubuntu

  1. 安装mysql

    root@ecs:~# cd /usr/local/src && tar -zxvf mysql-5.7.28-linux-glibc2.12-x86_64.tar.gz
    root@ecs:/usr/local/src# mv mysql-5.7.28-linux-glibc2.12-x86_64 /usr/local/mysql
    root@ecs:/usr/local/src# groupadd mysql
    root@ecs:/usr/local/src# useradd -s /sbin/nologin mysql -g mysql
    root@ecs:/usr/local/src# chown -R mysql:mysql /usr/local/mysql
    root@ecs:/usr/local/src# chmod -R 770 /usr/local/mysql
    root@ecs:/usr/local/src# chmod -R 777 /tmp
    root@ecs:/usr/local/src# ln -s /usr/lib/x86_64-linux-gnu/libncurses.so.6 /usr/lib/x86_64-linux-gnu/libncurses.so.5
    root@ecs:/usr/local/src# ln -s /usr/lib/x86_64-linux-gnu/libtinfo.so.6 /usr/lib/x86_64-linux-gnu/libtinfo.so.5
    root@ecs:/usr/local/src# /usr/local/mysql/bin/mysqld --initialize-insecure \
    --user=mysql \
    --basedir=/usr/local/mysql \
    --datadir=/usr/local/mysql/data \
    --explicit_defaults_for_timestamp=1
    
    [Warning] root@localhost is created with an empty password ! Please consider switching off the --initialize-insecure option.

    常见报错:

    • /usr/local/mysql/bin/mysql: error while loading shared libraries: libncurses.so.5: cannot open shared object file: No such file or directory
      解决方法:ln -s /usr/lib/x86_64-linux-gnu/libncurses.so.6 /usr/lib/x86_64-linux-gnu/libncurses.so.5
    • /usr/local/mysql/bin/mysql: error while loading shared libraries: libtinfo.so.5: cannot open shared object file: No such file or directory
      解决方法:ln -s /usr/lib/x86_64-linux-gnu/libtinfo.so.6 /usr/lib/x86_64-linux-gnu/libtinfo.so.5
****查看配置文件路径**

~~~shell
root@ecs:~# /usr/local/mysql/bin/mysql --help | grep "my.cnf"
~~~
  1. 配置my.cnf

    root@ecs:~# cat > /etc/my.cnf <<EOF
    [mysqld]
    lower_case_table_names=1
    datadir=/usr/local/mysql/data
    socket=/tmp/mysql.sock
    
    [mysqld_safe]
    log-error=/usr/local/mysql/log/mysql.log
    pid-file=/usr/local/mysql/data/mysql.pid
    
    !includedir /etc/my.cnf.d
    EOF
    root@ecs:~# mkdir /etc/my.cnf.d
  2. 配置服务

    root@ecs:~# cp /usr/local/mysql/support-files/mysql.server /etc/init.d/mysql
    root@ecs:~# sed -i "/^basedir=/cbasedir=/usr/local/mysql" /etc/init.d/mysql
    root@ecs:~# sed -i "/^datadir=/cdatadir=/usr/local/mysql/data" /etc/init.d/mysql
    root@ecs:~# mkdir -p /usr/local/mysql/log
    root@ecs:~# touch /usr/local/mysql/log/mysql.log
    root@ecs:~# chown -R mysql:mysql /usr/local/mysql/log

    启动服务

    root@ecs:~# /etc/init.d/mysql start

    或者:

    root@ecs:~# service mysql start
    root@ecs:~# systemctl enable --now mysql

参数配置

参数说明
character_set_server服务器级别字符集设置,没有明确指定字符集的情况下,数据库、表和列所使用的默认字符集
default_character_set创建数据库的默认字符集
default_character_setdefault-character-set等效
server_id=1集群内mysql服务器id,设置log_bin后必须设置server_id,否则无法启动mysql
log_bin开启Binlog并指定日志存放目录
log_bin_index指定Binlog索引存放目录
expire_logs_daysBinlog过期清理时间(天)
binlog_formatBinlog日志模式
binlog_do_db设置收集日志的数据库,不设置则收集全部数据库
binlog_ignore‌_db设置忽略收集日志的数据库
max_binlog_size单个日志最大文件大小
binlog_cache_sizeBinlog缓存大小,事务大于缓存大小,则使用磁盘
max_binlog_cache_size最大Binlog缓存大小,事务大于最大缓存大小,则事务失败
skip_name_resolve默认值:OFF,ON表示禁止DNS解析,这样连接服务器的客户端的主机名必须和mysql.user表中授权的主机名一致,否则将无法连接
主机名授权的优点:如果一个客户端的IP地址经常变化,那么基于IP的授权将会很繁琐,而客户端的主机名一般是不会变化的,因此基于主机名的授权只须授权一次。

操作

  • 登录数据库

    [root@ecs ~]# mysql -uroot -p
  • 查看配置信息

    [root@ecs ~]# show variables like '%character%';
    +--------------------------+----------------------------------+
    | Variable_name            | Value                            |
    +--------------------------+----------------------------------+
    | character_set_client     | utf8                             |
    | character_set_connection | utf8                             |
    | character_set_database   | latin1                           |
    | character_set_filesystem | binary                           |
    | character_set_results    | utf8                             |
    | character_set_server     | latin1                           |
    | character_set_system     | utf8                             |
    | character_sets_dir       | /usr/local/mysql/share/charsets/ |
    +--------------------------+----------------------------------+
    8 rows in set (0.01 sec)
  • 创建数据库

    mysql> create database maisi_db character set utf8mb4;
  • 修改数据库编码

    mysql> alter database maisi_db character set utf8mb4;

    查看数据库编码

    mysql> show variables like 'character_set_database';
  • 创建用户

    mysql> create user 'maisi'@'%' identified by 'XGu0ZWNSLGcp3nmu';
    mysql> grant select,insert,update,delete,create,drop,index,alter on maisi_db.* to 'maisi'@'%' identified by 'XGu0ZWNSLGcp3nmu';
    mysql> flush privileges;

    删除用户

    mysql> drop user maisi;
  • 修改表编码

    mysql> alter table app_user character set utf8mb4;
  • 修改字段编码

    mysql> alter table app_user change username username varchar(20) character set utf8mb4 not null;
  • 导入数据

    mysql> use maisi_db;
    mysql> source /data/maisi_db.sql;
  • 修改root密码

    Mysql初始化时如果没有使用--initialize-insecure,初始化会生成一个随机root密码,默认root密码是处于过期状态的,因此必须修改密码后才能正常使用,否则会报错:ERROR 1820 (HY000): You must reset your password using ALTER USER statement before executing this statement.

    修改密码的方法较多,支持的方法任选其一:

    方法1(仅适用于mysql 8.0以下版本):

    [root@ecs ~]# /usr/local/mysql/bin/mysql -uroot -e "grant all privileges on *.* to 'root'@'localhost' identified by 'changeme' with grant option;flush privileges;"

    或者:

    [root@ecs ~]# mysql -uroot -h 127.0.0.1 -p
    mysql> grant all privileges on *.* to 'root'@'localhost' identified by 'changeme' with grant option;
    mysql> flush privileges;

    注:

    • 如果开启过远程登录,须将localhost修改为%
    • changeme须修改为实际root密码。
    • mysql 8.0及之后版本不再支持grant授权时创建用户,必须分步操作,先创建用户再进行授权,参考方法7。

    方法2:

    mysql> set password=password('changeme');
    mysql> flush privileges;
    • 即使不用password函数,效果也是一样的。set password='changeme'set password=password('changeme');等效。
    • mysql 8.0及之后版本不再支持password函数,直接使用set password='changeme'

    方法3(仅适用于mysql 5.6及以下版本):

    mysql> update mysql.user set password=password('changeme') where user='root';
    mysql> flush privileges;

    方法4(仅适用于mysql 5.7版本):

    mysql> update mysql.user set authentication_string=password('changeme') where user='root';
    mysql> flush privileges;
    • mysql 5.7开始存储密码的字段由password改为authentication_string,mysql 8.0开始不再支持password函数,因此此方法仅适用于mysql 5.7版。
    • mysql 8.0+不支持password函数,只能设置authentication_string=''空密码。

    方法5(适用于mysql 5.7及以上版本):

    mysql> alter user 'root'@'localhost' identified by 'changeme';

    或者:

    mysql> alter user 'root'@'localhost' identified with mysql_native_password by 'changeme';

    如果修改当前登录用户,可以使用user()替换'root'@'localhost'

    方法6:

    [root@ecs ~]# mysqladmin -uroot -pchangeme password "changeme"

    方法7(仅适用于mysql 8.0及以后版本):

    mysql> create user 'root'@'%' identified by 'changeme';
    mysql> grant all privileges on *.* to 'root'@'%' with grant option;
    mysql> alter user 'root'@'%' identified with mysql_native_password by 'changeme';
    mysql> flush privileges;

    注:

    • grant all privileges on等效grant all on
    • with grant option允许用户将其拥有的权限授予给其他用户,因此必须添加,否则新增的root用户无法给其他用户授权;
    • create user默认使用caching_sha2_password身份认证,客户端如果不支持caching_sha2_password,可以修改成mysql_native_password;
    • mysql 8.0及之后版本create usergrant必须分步操作,mysql 8.0之前创建用户、设置密码、授权可以使用grant一步到位。
  • 开启远程登录

    mysql> update mysql.user set host='%' where user='root';
    mysql> flush privileges;
  • 设置密码有效期

    MySQL自5.6.6版开始,添加了password_expired功能,可以用来设置用户密码是否过期。账户密码过期后,用户可以登录到mysql服务器,但是不能执行任何命令,修改密码后才可执行账户权限内的所有命令。这个特性添加在mysql.user表的password_expired字段(默认值:N)。

    mysql> alter user user() identified with mysql_native_password by 'changeme' password expire interval 180 day failed_login_attempts 3 password_lock_time 2;

    密码有效期180天,启用登录失败跟踪(连续3次输入错误密码则锁定账户2天)

    MySQL自5.7.4版开始,可以通过全局变量default_password_lifetime(单位:天)来设置密码过期策略,MySQL会从启动时开始计算所有用户的密码过期时间。

    [mysqld]
    default_password_lifetime=120

    设置密码永不过期

    mysql> alter user 'root'@'localhost' password expire never;

    强制密码立即失效

    mysql> alter user 'root'@'localhost' password expire;
  • 无授权登录

    mysql 8.0之前版本,在配置文件中添加skip_grant_tables

    [mysqld]
    skip_grant_tables

    mysql 8.0及之后版本,不再支持配置文件skip_grant_tables项,须使用--skip-grant-tables参数启动mysql服务:

    [root@ecs ~]# mysqld --console --skip-grant-tables --shared-memory

    打开新会话窗口登录:

    [root@ecs ~]# mysql -uroot -p

常见报错

1251 - Client does not support authentication protocol reuqested by server; consider upgrading MySQL client

mysql 8.0.11之后使用caching_sha2_password插件进行身份验证,而一些低版本客户端不支持caching_sha2_password,依旧使用的是mysql_native_password插件进行身份验证,因此验证失败。

解决方式:升级客户端,使其支持caching_sha2_password,或者将mysql的用户密码加密规则改为mysql_native_password。

方法1:指定mysql_native_password认证插件设置密码(推荐)

mysql> alter user 'root'@'%' identified with mysql_native_password by 'changeme';
mysql> flush privileges;

方法2:手动更新身份认证插件

  • 查看授权信息

    mysql> select host,user,authentication_string,plugin from mysql.user;
    +-----------+------------------+------------------------------------------------------------------------+-----------------------+
    | host      | user             | authentication_string                                                  | plugin                |
    +-----------+------------------+------------------------------------------------------------------------+-----------------------+
    | %         | root             | $A$005$HYFpxsnfU[n|"&yh48JKDV..KTNA/H55wuaICzsXLRGYQr2/gybGCdV1i5 | caching_sha2_password |
    | localhost | mysql.infoschema | $A$005$THISISACOMBINATIONOFINVALIDSALTANDPASSWORDTHATMUSTNEVERBRBEUSED | caching_sha2_password |
    | localhost | mysql.session    | $A$005$THISISACOMBINATIONOFINVALIDSALTANDPASSWORDTHATMUSTNEVERBRBEUSED | caching_sha2_password |
    | localhost | mysql.sys        | $A$005$THISISACOMBINATIONOFINVALIDSALTANDPASSWORDTHATMUSTNEVERBRBEUSED | caching_sha2_password |
    YEq0QvCJD2A2pT3oubzhEVlDAoZ549WM0hjVds4zZKK/ | caching_sha2_password |
    +-----------+------------------+------------------------------------------------------------------------+-----------------------+
  • 更换验证插件

    mysql> update mysql.user set plugin='mysql_native_password' where user='root';
    mysql> update mysql.user set authentication_string='' where user='root';
    mysql> flush privileges;
    mysql> alter user user() identified by 'changeme';
    mysql> alter user 'root'@'%' identified by 'changeme';

    mysql 8开始不再支持password函数,因此无法直接给authentication_string设置mysql_native_password加密方式的密文。

    注:

    • 不能直接使用alter user user() identified by 'changeme';
      更新mysql.user表某个用户的plugin为mysql_native_password后,内存中的plugin信息并未变更,执行alter user user() identified by 'changeme';修改密码依旧是caching_sha2_password加密方式;
    • 执行flush privileges;会重新加载权限表(mysql.user、mysql.db等)到内存,此时用户的plugin为mysql_native_password,但authentication_string却是caching_sha2_password密文,导致无法验证,执行alter user user() identified by 'changeme';会报错:ERROR 1396 (HY000): Operation ALTER USER failed for 'root'@'%',因此必须将authentication_string置空以避免验证;
    • alter user user() identified by 'changeme';修改的只是当前会话用户的密码,如果root用户有多个host,必须给所有的root用户都重置一下密码。

ERROR 1290 (HY000): The MySQL server is running with the --skip-grant-tables option so it cannot execute this statement

解决方法:

mysql> flush privileges;

ERROR 1396 (HY000): Operation ALTER USER failed for 'root'@'skip-grants host'

解决方法:

mysql> alter user 'root'@'localhost' identified with mysql_native_password by 'changeme';

host不一定是localhost,也有可能是%,必须根据查询后的值来设置。

mysql> select host from mysql.user where user='root';

ERROR 1130 (HY000): Host '::1' is not allowed to connect to this MySQL server

mysql.user中root用户的host默认为localhost,而当前连接的主机名是IPv6的::1,两者不一致,因此拒绝访问。

解决方法:

方法1:开启DNS解析,mysql会解析localhost和::1的IP地址,只要IP地址一致即允许连接。

[mysqld]
skip_name_resolve=OFF

方法2:跳过授权验证,修改host为%。

  1. 修改配置文件

    [mysqld]
    skip_grant_tables
  2. 登录mysql,无需输入密码,直接回车登录:

    [root@ecs ~]# mysql -uroot -p
  3. 修改root用户的host值:

    mysql> update mysql.user set host='%' where user='root';
    mysql> flush privileges;

mariadb-libs is obsoleted by mysql-community-libs-8.0.19-1.el7.x86_64

CentOS 7安装了被废弃的mariadb-libs,需要先卸载mariadb-libs。

[root@ecs ~]# yum remove -y mysql-libs

存储引擎

InnoDB

存储结构

版本frmibdopt
<5.7× 数据默认存在系统表空间ibdata1(包含innodb表元数据、undo日志、修改buffer和双写buffer)
5.7每个库有独立的opt文件存储库的信息(如字符集等)
ibd存储表数据(独立表空间)
8.0××frm被sdi取代,sdi(Serialized Dictionary Information)是指表结构元数据。

mysql5.7以下版本开启独立表空间

my.ini:

innodb_file_per_table=1

查看是否生效:

mysql> show variables like 'innodb_file_per_table';
+-----------------------+-------+
| Variable_name         | Value |
+-----------------------+-------+
| innodb_file_per_table | ON    |
+-----------------------+-------+
1 row in set (0.00 sec)
mysql> show variables like 'innodb_data_file_path';
+-----------------------+------------------------+
| Variable_name         | Value                  |
+-----------------------+------------------------+
| innodb_data_file_path | ibdata1:10M:autoextend |
+-----------------------+------------------------+
1 row in set (0.00 sec)

ibdata1

ibdata1是一个用来构建InnoDB系统表空间的文件,这个文件包含了innodb表的元数据、undo日志、修改buffer和双写buffer。随着数据库的使用,ibdata1文件会越来越大,innodb_autoextend_increment选项则指定了该文件每次自动增长的步进,默认是8M。

当在MySQL中对InnoDB表进行更改时,这些更改首先存储在InnoDB日志缓冲区的内存中,然后写入通常称为重做日志(redo logs)的InnoDB日志文件中。

MySQL开启独享表空间后,会为每个Innodb表创建一个.ibd的文件。开启方法:innodb_file_per_table=1,这样业务数据将使用独享表空间,而不用全部写入系统表空间ibdata1。

innodb_data_home_dir指定系统表空间文件存放目录,默认为datadir目录。

innodb_data_file_path配置多个innodb tablespace的文件名及文件大小:
innodb_data_file_path=ibdata1:18M;ibdata2:12M:autoextend,只有最后一个表空间文件可以被指定为:autoextend(自动扩展)。

表空间大小必须与当前文件的实际大小匹配,否则会报错:

InnoDB: Error: data file .\ibdata1 is of a different size
InnoDB: 1152 pages (rounded down to MB)
InnoDB: than specified in the .cnf file 16384 pages!

计算公式:1152(pages) / 64(pages/M) = 18(M)

数据恢复

  1. 删除ibdata1、ib_logfile0和ib_logfile1后,启动mysql;
  2. 新建库,按照需要恢复库中的表名新建表。如果没有表结构,可以使用mysql-utilities工具读取frm文件获取表结构;
  3. 停止mysql服务,把原来表的frm文件覆盖到新建的库,修改my.ini后重启mysql服务:

    [mysqld]
    innodb_force_recovery=6
  4. 删除.ibd文件:

    mysql> use maisi_db;
    mysql> alter table app_user discard tablespace;

    如果提示:Cannot delete or update a parent row: a foreign key constraint fails,则需要先关闭外键约束检查,执行删除.ibd命令后,再开启外键约束检查。

    mysql> set foreign_key_checks=0;
    mysql> alter table app_user discard tablespace;
    mysql> set foreign_key_checks=1;
  5. 停止mysql,将原表的ibd文件拷贝到当前库;
  6. 启动mysql,绑定表结构和表数据:

    mysql> use maisi_db;
    mysql> alter table app_user import tablespace;

自动备份

  1. 创建备份脚本backup.sh

    #!/bin/sh
    
    /usr/local/mysql/bin/mysqldump -umaisi -pXGu0ZWNSLGcp3nmu maisi_db --default-character-set=utf8 --opt --skip-lock-tables > /data/backup/maisi_db_`date +%Y-%m-%d`.sql
    
    find /data/backup/ -name "maisi_db_*" -type f -mtime +7 -exec rm {} \;

    docker部署mysql

    #!/bin/sh
    
    MYSQLDUMP="docker exec mysql /usr/bin/mysqldump"
    $MYSQLDUMP -h127.0.0.1 -u maisi -pXGu0ZWNSLGcp3nmu maisi_db > /data/backup/maisi_db_$(date +%Y-%m-%d).sql
  2. 自动运行

    [root@ecs ~]# echo "0 0 */1 * * root /data/backup/backup.sh" >> /etc/crontab
    [root@ecs ~]# systemctl restart crond

    0 0 */1 * *:表示每天00:00(0分0小时)执行一次。

    或者:

    [root@ecs ~]# cat >> /etc/cron.d/backup << EOF
    SHELL=/bin/bash
    PATH=/sbin:/bin:/usr/sbin:/usr/bin
    0 0 */1 * * root /data/backup/backup.sh
    EOF
    [root@ecs ~]# systemctl restart crond
MongoDB是一个基于分布式文件存储的数据库,由C++编写,旨在为WEB应用提供可扩展的高性能数据存储解决方案。

MongoDB将数据存储为一个文档,数据结构由键值对组成,MongoDB文档类似于JSON对象,字段值可以包含其他文档,数组及文档数组。

MongoDB服务端可运行在Linux、Windows或macOS X平台,支持32位和64位应用,默认端口为27017。

安装

Windows

进入MongoDB官网下载预编译二进制包(下载地址:https://www.mongodb.com/download-center/community),打开之后选择Version后,点击Download下载即可。

msi安装向导

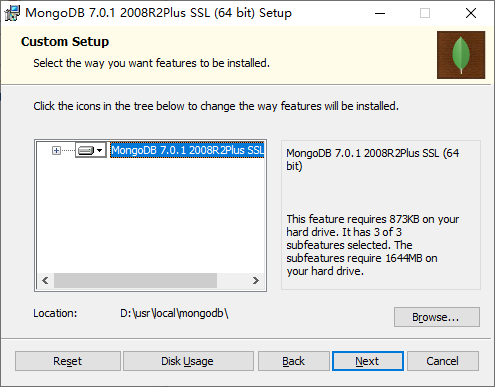
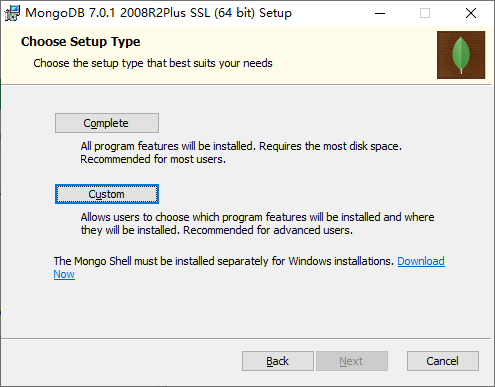
  1. 点击下载好的mongodb-windows-x86_64-6.0.5-signed.msi,安装类型需要选择Custom

  2. 修改安装目录为:D:\usr\local\mongodb

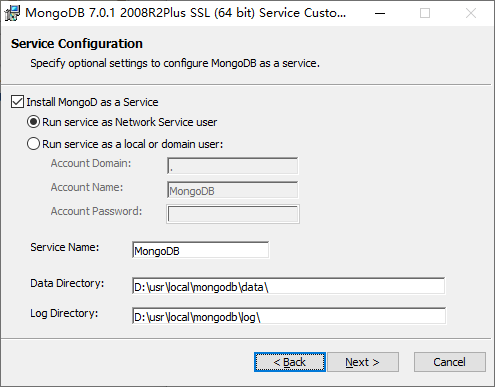
  3. 服务配置保持默认值;

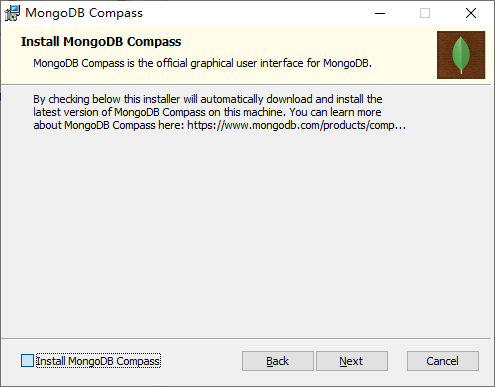
  4. 需要将Install MongoDB Compass的勾去掉,否则安装过程中会下载Install MongoDB Compass并安装,比较耗费时间。Install MongoDB Compass是一个图形界面管理工具,可以使用其他GUI管理工具,如:Navicat for MongoDB

    之后一直Next直到安装完成。

    安装完成后,浏览器访问:http://localhost:27017/,如果显示:It looks like you are trying to access MongoDB over HTTP on the native driver port.说明MongoDB已经安装成功了。

zip手动安装

下载地址:https://fastdl.mongodb.org/windows/mongodb-windows-x86_64-6.0.10.zip

  1. 解压mongodb-windows-x86_64-6.0.10.zip文件到:D:\usr\local\mongodb
  2. 切换到D:\usr\local\mongodb目录,创建datalog目录,分别用于存储数据库和日志文件;
  3. 切换到D:\usr\local\mongodb目录,创建配置文件mongod.cfg,内容参考:

    storage:
      dbPath: D:\usr\local\mongodb\data
    
    systemLog:
      destination: file
      logAppend: true
      path:  D:\usr\local\mongodb\log\mongod.log
    
    net:
      port: 27017
      bindIp: 127.0.0.1
  4. 注册MongoDB服务

    C:\Users\Administrator> D:\usr\local\mongodb\bin\mongod --config "D:\usr\local\mongodb\mongod.cfg" --install --serviceName "MongoDB"
  5. 启动MongoDB服务

    C:\Users\Administrator> net start mongodb
  6. 卸载MongoDB服务

    C:\Users\Administrator> D:\usr\local\mongodb\bin\mongod --remove

Linux

5.0.9

[root@ecs src]# wget https://fastdl.mongodb.org/linux/mongodb-linux-x86_64-rhel70-5.0.9.tgz
[root@ecs src]# tar -zxvf mongodb-linux-x86_64-rhel70-5.0.9.tgz -C /usr/local
[root@ecs src]# mv /usr/local/mongodb-linux-x86_64-rhel70-5.0.9 /usr/local/mongodb
[root@ecs src]# mkdir /usr/local/mongodb/{data,log}
[root@ecs src]# cat > /etc/mongodb.cnf <<EOF
dbpath=/usr/local/mongodb/data
logpath=/usr/local/mongodb/log/mongodb.log
port=27017
fork=true
journal=false
bind_ip=0.0.0.0
auth=true
EOF
[root@ecs src]# echo "export PATH=\$PATH:/usr/local/mongodb/bin/" >> /etc/profile
[root@ecs src]# source /etc/profile
[root@ecs src]# mongod -f /etc/mongodb.cnf
about to fork child process, waiting until server is ready for connections.
forked process: 20927
child process started successfully, parent exiting
  • fork=true:后台运行
  • auth=true:开启授权登录模式

重启

> use admin
> db.shutdownServer()
server should be down...
> exit
[root@ecs ~]# mongod --config /etc/mongodb.cnf

7.0.11

[root@ecs src]# wget https://fastdl.mongodb.org/linux/mongodb-linux-x86_64-rhel70-7.0.11.tgz
[root@ecs src]# tar -zxvf mongodb-linux-x86_64-rhel70-7.0.11.tgz
[root@ecs src]# mv mongodb-linux-x86_64-rhel70-7.0.11 /usr/local/mongodb
[root@ecs src]# mkdir /usr/local/mongodb/{data,log}
[root@ecs src]# cat > /etc/mongodb.conf <<EOF
storage:
  dbPath: /usr/local/mongodb/data

systemLog:
  destination: file
  logAppend: true
  path:  /usr/local/mongodb/log/mongod.log

net:
  port: 27017
  bindIp: 0.0.0.0


processManagement:
  fork: true
  pidFilePath: /var/run/mongod.pid
  timeZoneInfo: /usr/share/zoneinfo

security:
  authorization: enabled
EOF
[root@ecs src]# echo "export PATH=\$PATH:/usr/local/mongodb/bin/" >> /etc/profile
[root@ecs src]# source /etc/profile
[root@ecs src]# mongod -f /etc/mongodb.conf
[root@ecs src]# ps -aux | grep 'mongod' | grep -v 'grep'
root     26335  0.8  1.3 2699260 105684 ?      Sl   03:11   0:04 mongod -f /etc/mongodb.conf
  • fork: true:以守护程序的方式启用(后台运行)
  • bindIp: 0.0.0.0:允许外网访问
  • authorization: enabled:开启授权模式

Docker

  1. 创建容器;

    7.0.11

    [root@ecs ~]# docker run --name mongo \
    --restart=always \
    -p 27017:27017 \
    -v /data/mongo/data:/data/db \
    -v /data/mongo/log:/data/log \
    --privileged=true \
    -d registry.cn-shanghai.aliyuncs.com/maisi/mongo:7.0.11 --auth

    设置管理员账号和密码:

    [root@ecs ~]# docker run --name mongo \
    --restart=always \
    -p 27017:27017 \
    -v /data/mongo/data:/data/db \
    -v /data/mongo/log:/data/log \
    -e MONGO_INITDB_ROOT_USERNAME=admin \
    -e MONGO_INITDB_ROOT_PASSWORD=ay2ikfyYonmKvFkS \
    --privileged=true \
    -d registry.cn-shanghai.aliyuncs.com/maisi/mongo:7.0.11

    4.2.8

    [root@ecs ~]# docker run --name mongo \
    --restart=always \
    -p 27017:27017 \
    -v /data/mongo/data:/data/db \
    -v /data/mongo/log:/data/log \
    -e MONGO_INITDB_ROOT_USERNAME=admin \
    -e MONGO_INITDB_ROOT_PASSWORD=ay2ikfyYonmKvFkS \
    --privileged=true \
    -d registry.cn-shanghai.aliyuncs.com/maisi/mongo:4.2.8
    • --auth要求必须验证密码才能进行基于角色的访问控制,没有密码虽然可以登录shell,但是无法执行实质性的数据操作;
    • 即使没有添加--auth,只要设置了MONGO_INITDB_ROOT_USERNAMEMONGO_INITDB_ROOT_PASSWORD环境变量,则自动追加--auth
    • 即使设置了--auth,由于MongoDB有本地例外(Localhost Exception)机制,即数据库中没有创建任何超级用户时,为了防止锁死,仍然允许localhost或127.0.0.1发起的连接拥有最高权限。添加了超级用户后,本地例外机制失效。
  2. 操作MongoDB

    [root@ecs ~]# docker exec -it mongo /bin/bash
    • 进入mongo shell

      root@38857e5751d8:/# mongosh
      Current Mongosh Log ID: 6a6225fea56d2a74a7a26a12
      Connecting to:          mongodb://127.0.0.1:27017/?directConnection=true&serverSelectionTimeoutMS=2000&appName=mongosh+2.2.6
      Using MongoDB:          7.0.11
      Using Mongosh:          2.2.6
      
      For mongosh info see: https://docs.mongodb.com/mongodb-shell/
      
      
      To help improve our products, anonymous usage data is collected and sent to MongoDB periodically (https://www.mongodb.com/legal/privacy-policy).
      You can opt-out by running the disableTelemetry() command.
      
      test>
    • 登录admin数据库

      [root@ecs ~]# docker exec -it mongo mongosh admin
      Current Mongosh Log ID: 6a6226363f9e10a413a26a12
      Connecting to:          mongodb://127.0.0.1:27017/admin?directConnection=true&serverSelectionTimeoutMS=2000&appName=mongosh+2.2.6
      Using MongoDB:          7.0.11
      Using Mongosh:          2.2.6
      
      For mongosh info see: https://docs.mongodb.com/mongodb-shell/
      
      admin> 
  3. 配置外网访问

    1. 进入mongodb容器

      [root@ecs ~]# docker exec -it mongo /bin/bash
    2. 容器内修改配置文件

      root@38857e5751d8:/# cp /etc/mongod.conf.orig /etc/mongod.conf
      root@38857e5751d8:/# sed -i 's/bindIp: 127.0.0.1/bindIp: 0.0.0.0/g' /etc/mongod.conf
    3. 退出容器并重启mongodb容器

      root@38857e5751d8:/# exit
      [root@ecs ~]# docker restart mongo

客户端操作

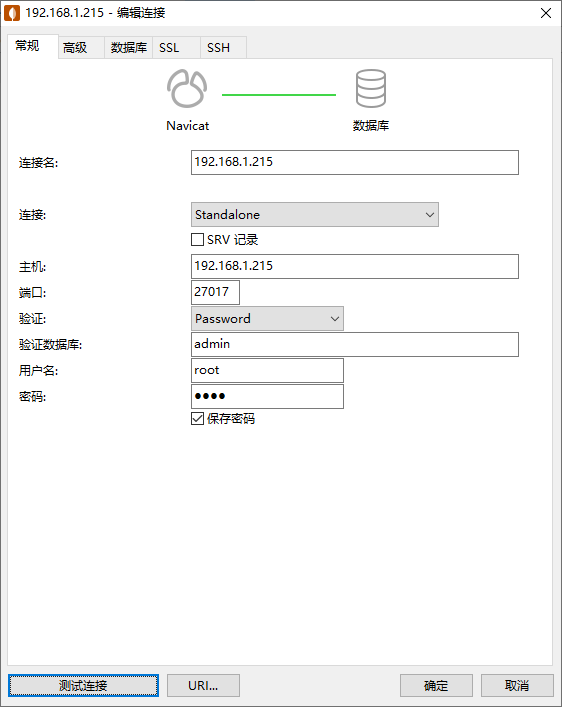
安装Navicat for MongoDB,创建数据库连接:

如果MongoDB设置了以授权方式登录,验证类型需要选择Password,验证数据库选择admin,输入用户名和密码后,可以点击测试连接测试一下数据库是否连接成功。

点击确定即可创建数据库连接了。

Navicat for MongoDB激活方式:

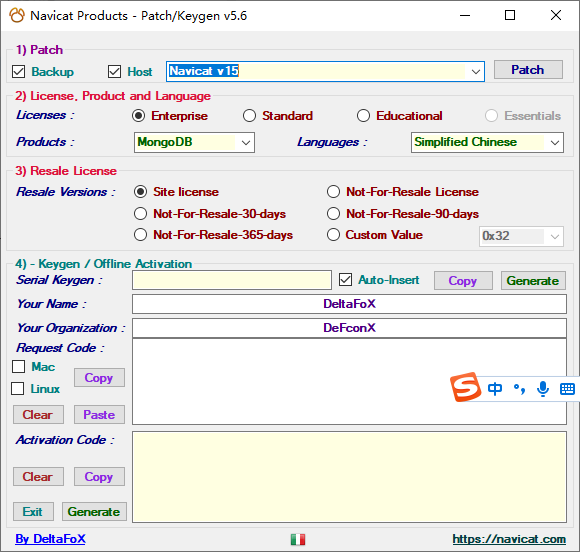
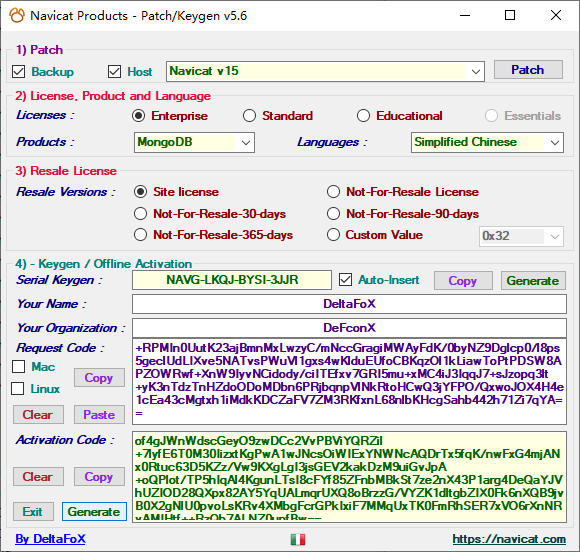
  1. 打开注册机程序,Patch勾选BackupHost,选择Navicat v 15。License选择Enterprise,Product选择MongoDB,Language选择Simplified Chinese

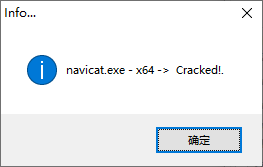
    点击Patch,出现以下提示表示navicat.exe破解成功,此时还没有许可证,接着往下操作;

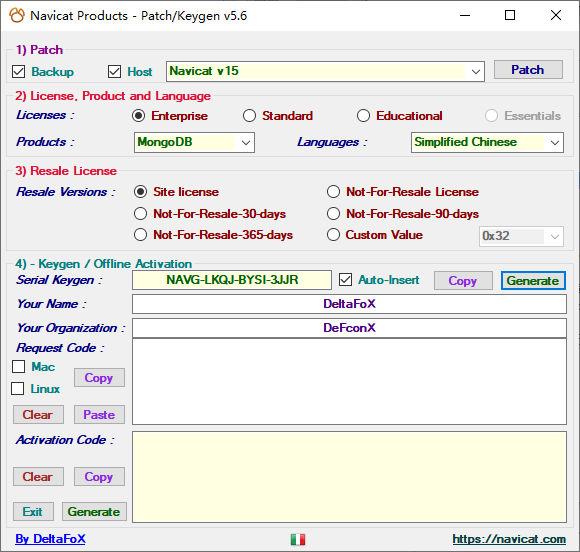
  2. Keygen / Offline Activation,点击Generate生成序列号;

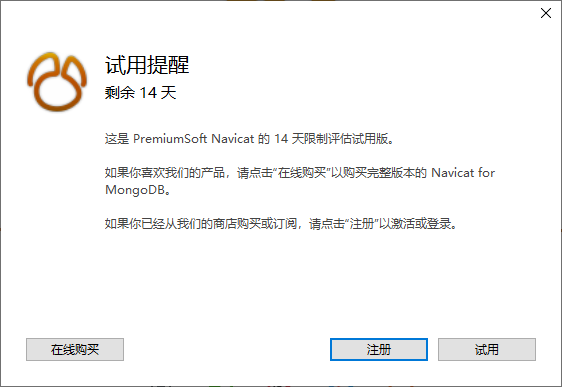
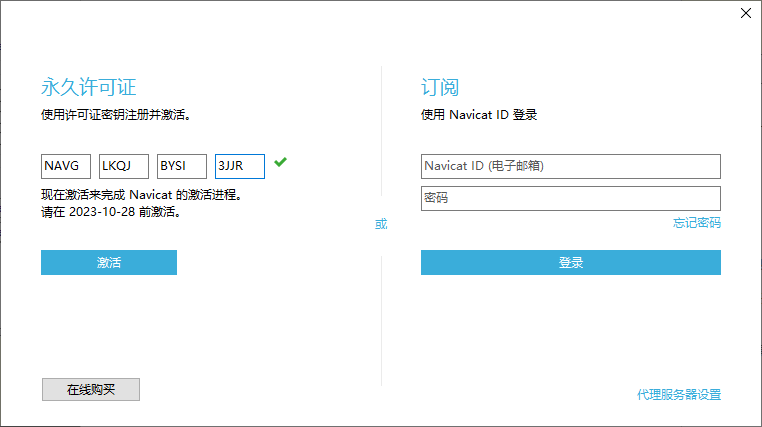
  3. 重新打开Navicat for MongoDB,在试用提醒对话框中选择“注册”;

  4. 输入第2步生成的序列号,点击“激活”;

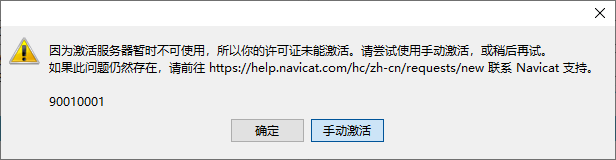
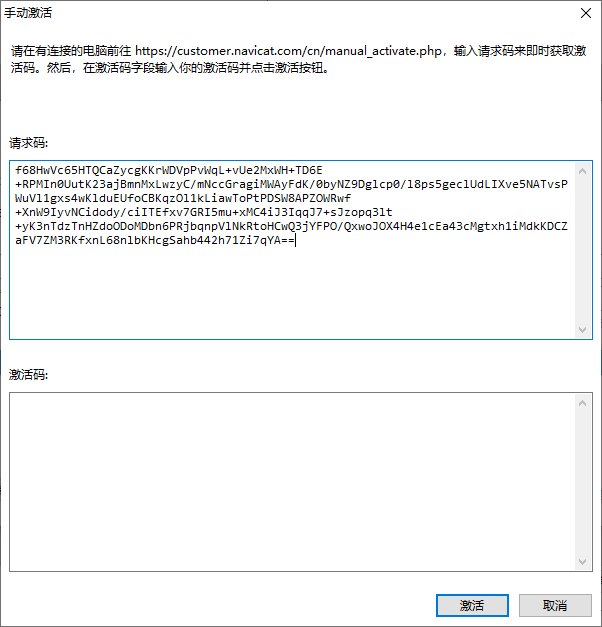
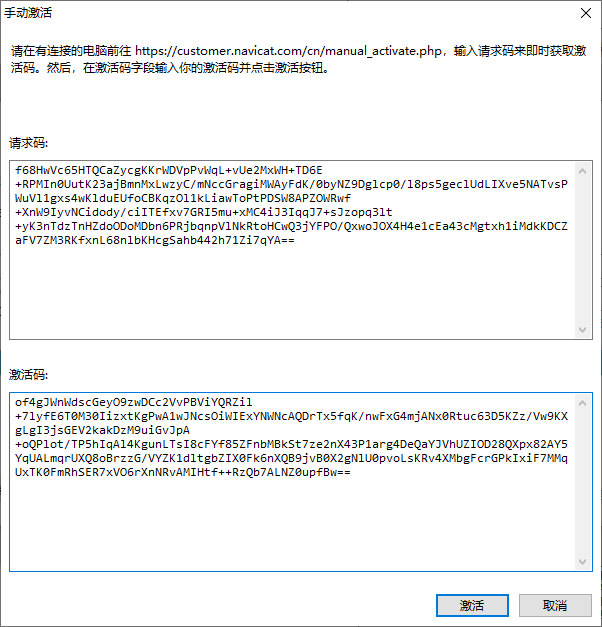
  5. 选择“手动激活”,弹出“手动激活”对话框,复制请求码;

  6. 切换到Navicat Products - Patch/Keygen,将复制的请求码粘贴到Request Code输入框中,点击Activation Code下面的Generate生成激活码;

  7. 最后再将激活码回填到Navicat for MongoDB的激活窗口中,点击“激活”;

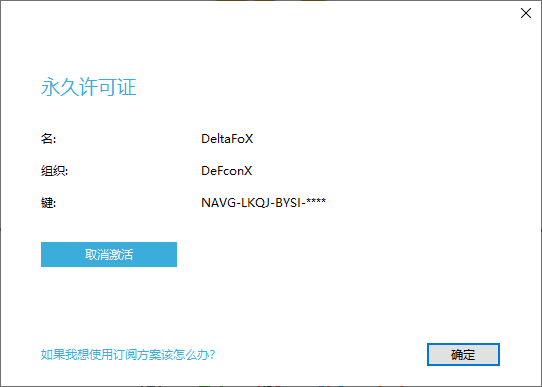
    出现永久许可证界面,表明已经激活成功了。

命令行操作

数据库

  • 进入mongo shell

    MongoDB 6之前版本:

    [root@ecs ~]# mongo
    MongoDB shell version v5.0.9
    connecting to: mongodb://127.0.0.1:27017/?compressors=disabled&gssapiServiceName=mongodb
    Implicit session: session { "id" : UUID("dc9cb95a-f071-49de-bd6f-0dacae8e3b00") }
    MongoDB server version: 5.0.9
    ================
    Warning: the "mongo" shell has been superseded by "mongosh",
    which delivers improved usability and compatibility.The "mongo" shell has been deprecated and will be removed in
    an upcoming release.
    For installation instructions, see
    https://docs.mongodb.com/mongodb-shell/install/
    ================
    >

    MongoDB自6.0开始不再默认安装shell工具,需要额外安装mongosh,下载地址:https://www.mongodb.com/try/download/shell

    [root@ecs ~]# mongosh
  • 连接远程数据库

    [root@ecs ~]# mongosh -u root -p root --port 27017 --host 192.168.1.215
  • 获取mongdb版本

    admin> db.version()
    7.0.11
    admin> db.system.version.find()
    [
      { _id: 'featureCompatibilityVersion', version: '7.0' },
      { _id: 'authSchema', currentVersion: 5 }
    ]
    admin> 
  • 授权登录

    方法1

    admin> db.auth('admin', 'ay2ikfyYonmKvFkS')
    { ok: 1 }
    admin> 

    方法2

    [root@ecs ~]# mongosh admin -u admin -p ay2ikfyYonmKvFkS
    Current Mongosh Log ID: 6a6237969b309148aaa26a12
    Connecting to:          mongodb://<credentials>@127.0.0.1:27017/admin?directConnection=true&serverSelectionTimeoutMS=2000&appName=mongosh+2.2.6
    Using MongoDB:          7.0.11
    Using Mongosh:          2.2.6
    
    For mongosh info see: https://docs.mongodb.com/mongodb-shell/
    
    admin> 

    方法3

    [root@ecs ~]# mongosh mongodb://admin:'ay2ikfyYonmKvFkS'@127.0.0.1:27017
    [root@ecs ~]# mongosh mongodb://admin:'ay2ikfyYonmKvFkS'@127.0.0.1:27017/maisi_db --authenticationDatabase admin

    当直接登录数据库时,默认会到登录数据库中获取用户名和密码,而超级用户是存储在admin库中的,因此会因找不到用户而报错。可以使用--authenticationDatabase指定授权数据库。

    [root@ecs ~]# mongosh maisi_db -u admin -p ay2ikfyYonmKvFkS --authenticationDatabase admin
  • 查看所有数据库

    admin> show dbs
    admin   100.00 KiB
    config   12.00 KiB
    local    72.00 KiB
  • 查看当前库下所有表

    admin> show tables
    system.users
    system.version
  • 切换test数据库

    admin> use test
    switched to db test
    test> 
  • 创建数据库(不存在则创建,存在则切换数据库)

    admin> use maisi_db
    switched to db maisi_db
    maisi_db> 
  • 删除数据库

    maisi_db> db.dropDatabase()
    { ok: 1, dropped: 'maisi_db' }
    maisi_db> 
  • 获取当前数据库名称

    maisi_db> db
    maisi_db
    maisi_db> db.getName()
    maisi_db
  • 获取数据库信息

    maisi_db> db.stats()
    {
      db: 'maisi_db',
      collections: Long('0'),
      views: Long('0'),
      objects: Long('0'),
      avgObjSize: 0,
      dataSize: 0,
      storageSize: 0,
      indexes: Long('0'),
      indexSize: 0,
      totalSize: 0,
      scaleFactor: Long('1'),
      fsUsedSize: 0,
      fsTotalSize: 0,
      ok: 1
    }
  • 备份数据库

    MongoDB导入导出工具从4.4版开始不再随数据库自动安装,而需手动安装MongoDB Database Tools,下载地址:https://www.mongodb.com/try/download/database-tools

    [root@ecs ~]# tar -zxvf mongodb-database-tools-rhel70-x86_64-100.8.0.tgz
    [root@ecs ~]# mv -uf mongodb-database-tools-rhel70-x86_64-100.8.0/bin/* /usr/local/mongodb/bin
    [root@ecs ~]# echo "export PATH=\$PATH:/usr/local/mongodb/bin" >> /etc/profile
    [root@ecs ~]# source /etc/profile
    [root@ecs ~]# mkdir -p /data/backup
    [root@ecs ~]# mongodb://root:'root'@127.0.0.1:27017/maisi_db --authenticationDatabase admin
    maisi_db> db.fsyncLock()

    另起一个终端:

    [root@ecs ~]# mongodump -u root --password 'root' --authenticationDatabase admin -h 127.0.0.1 -d maisi_db -o /data/backup

    或者:

    [root@ecs ~]# mongodump --uri=mongodb://root:root@127.0.0.1:27017/maisi_db?authSource=admin -o /data/backup

    等待备份完成,重新返回Mongo Shell,继续执行:

    maisi_db> db.fsyncUnlock()
  • 还原数据库

    maisi_db> db.dropDatabase()
    [root@ecs ~]# mongorestore -h 127.0.0.1:27017 --authenticationDatabase=admin -u root -p 'root' -d maisi_db /data/backup/maisi_db

    或者:

    [root@ecs ~]# mongorestore --drop -h 127.0.0.1:27017 --authenticationDatabase=admin -u root -p 'root' -d maisi_db /data/backup/maisi_db

    注:还原数据库之前,必须先删除旧库或者添加--drop,否则在恢复数据库的时候,集合中遇到相同的_id会报错。

用户

  • 创建超级权限root角色用户

    admin> db.createUser({user: 'root', pwd: 'root', roles: [{role: 'root', db: 'admin'}]})
    { ok: 1 }

    创建root级别的用户和管理员级别的用户都只能在admin数据库里面执行,创建指定数据库的所有者需要通过use切换数据库。另外,需要注意,系统级别的函数,比如:db.system.users.find()(查看系统所有用户),只能在admin数据库下执行,创建用户和执行其他系统函数的时候需要先使用db.auth鉴权

  • 添加最高级权限

    admin> db.grantRolesToUser("root", [{ role: "__system", db: "admin"}])
  • 创建库用户(必须先切换到对应库)

    admin> db.auth('root', 'root')
    admin> use maisi_db
    maisi_db> db.createUser({user: 'maisi', pwd: 'kJTzjgSnIKqbZ4UD', roles: [{role: 'dbOwner', db: 'maisi_db'}]})
    { ok: 1 }
  • 删除库用户

    maisi_db> db.dropUser('maisi')
    { ok: 1 }

    或者切换到admin库下操作db.system.users(必须切换到admin库,否则没有权限):

    admin> db.system.users.deleteOne({user: 'maisi'})
    { acknowledged: true, deletedCount: 1 }
  • 修改库用户密码

    maisi_db> db.updateUser('maisi', {pwd: 'sCUKbQgHwI1VdUIw'})
    { ok: 1 }

    或者:

    maisi_db> db.changeUserPassword("maisi", "sCUKbQgHwI1VdUIw")
    { ok: 1 }
  • 更改用户角色

    maisi_db> db.updateUser('maisi', {roles: [{ role: "dbOwner", db: "maisi_db" }]})
    { ok: 1 }
  • 查询所有用户(必须切换到admin)

    admin> db.system.users.find()
  • 查看当前数据库用户权限

    maisi_db> show users
    [
      {
        _id: 'maisi_db.maisi',
        userId: UUID('8737b649-ce51-4de3-8dac-54296969f66e'),
        user: 'maisi',
        db: 'maisi_db',
        roles: [ { role: 'dbOwner', db: 'maisi_db' } ],
        mechanisms: [ 'SCRAM-SHA-1', 'SCRAM-SHA-256' ]
      }
    ]
    
    maisi_db> db.getUsers()
    {
      users: [
        {
          _id: 'maisi_db.maisi',
          userId: UUID('8737b649-ce51-4de3-8dac-54296969f66e'),
          user: 'maisi',
          db: 'maisi_db',
          roles: [ { role: 'dbOwner', db: 'maisi_db' } ],
          mechanisms: [ 'SCRAM-SHA-1', 'SCRAM-SHA-256' ]
        }
      ],
      ok: 1
    }
    maisi_db> db.getUser('maisi')
    {
      _id: 'maisi_db.maisi',
      userId: UUID('8737b649-ce51-4de3-8dac-54296969f66e'),
      user: 'maisi',
      db: 'maisi_db',
      roles: [ { role: 'dbOwner', db: 'maisi_db' } ],
      mechanisms: [ 'SCRAM-SHA-1', 'SCRAM-SHA-256' ]
    }
  • 新增角色

    maisi_db> db.grantRolesToUser("maisi", [{role: "userAdmin", db: "maisi_db"}])
    { ok: 1 }
  • 删除角色

    maisi_db> db.revokeRolesFromUser("maisi", [{role: "userAdmin", db: "maisi_db"}])
    { ok: 1 }

集合

  • 查看所有集合

    maisi_db> show tables
    app_user
    maisi_db> show collections
    app_user
  • 写入文档

    mongo

    > db.app_user.insert({username: 'alice'})
    WriteResult({ "nInserted" : 1 })

    mongosh

    maisi_db> db.app_user.insertOne({username: 'bob', skill: ['电脑', '音乐']})
    {
      acknowledged: true,
      insertedIds: { '0': ObjectId('6a62dc4b8378d289b0a26a14') }
    }
  • 查询文档

    • 普通查询

      mongo

      > db.app_user.find()
      { "_id" : ObjectId("6a63707319c415e8b0f5d4de"), "username" : "bob", "skill" : [ "电脑", "音乐" ] }
      { "_id" : ObjectId("6a63708c19c415e8b0f5d4df"), "username" : "alice" }

      mongosh

      maisi_db> db.app_user.find()
      [
        { _id: ObjectId('6a62d6368378d289b0a26a13'), username: 'alice' },
        {
          _id: ObjectId('6a62dc4b8378d289b0a26a14'),
          username: 'bob',
          skill: [ '电脑', '音乐' ]
        }
      ]
    • 隐藏字段

      maisi_db> db.app_user.find({}, {username: 1, _id: 0})
      [ { username: 'alice' }, { username: 'bob' } ]
    • 限制数组字段元素个数

      maisi_db> db.app_user.find({}, {"skill": {$slice: [0,1]}})
      [
        { _id: ObjectId('6a62d6368378d289b0a26a13'), username: 'alice' },
        {
          _id: ObjectId('6a62dc4b8378d289b0a26a14'),
          username: 'bob',
          skill: [ '电脑' ]
        }
      ]

      $slice语法:

      解释
      $slice(n)返回数组前n个
      $slice(-n)返回数组后n个
      $slice(m, n)从数组第m+1个开始,返回前n个
      $slice(-m, n)从数组倒数第m个开始,返回前n个
    • 条件查询

      符号说明
      $gt大于
      $gte大于或等于
      $lt小于
      $lte小于或等于
      $ne不等于
      $in在范围内
      $nin不在范围内
      maisi_db> db.app_user.find({username: 'alice'})
      maisi_db> db.app_user.find({age: {$gt: 20}})
      maisi_db> db.app_user.find({age: {$gt: 20, $lt: 50}})
      maisi_db> db.app_user.find({username: {$ne: 'alice'}})
      maisi_db> db.app_user.find({username: {$in: ['alice', 'bob']}})
    • 去重查询

      maisi_db> db.app_user.distinct('username')
      [ "alice", "bob" ]
      maisi_db> db.app_user.distinct('username', {age: {$gt: 20}})
      [ "alice" ]
    • 正则查询

      maisi_db> db.app_user.find({username:/^ali/})
      maisi_db> db.app_user.find({username: {$regex: '^ali.*'}})
    • 字段存在查询

      maisi_db> db.app_user.find({age: {$exists: true}})

      注:$exists只判断字段是否存在,不判断字段的值。

    • 字段类型查询

      maisi_db> db.app_user.find({username: {$type: 'string'}})
    • 模查询

      maisi_db> db.app_user.find({age: {$mod: [10, 2]}})
    • 全文检索

      maisi_db> db.app_user.createIndex({skill: 'text', hobby: 'text'})
      {
        "createdCollectionAutomatically" : false,
        "numIndexesBefore" : 2,
        "numIndexesAfter" : 3,
        "ok" : 1
      }
      maisi_db> db.app_user.find({$text: {$search: "电脑 游戏"}})
      maisi_db> db.app_user.find({$text: {$search: "-电脑 游戏"}})
      
      maisi_db> db.app_user.updateOne({username: 'alice'}, {$set: {hobby: 'watch TV,play game'}})
      maisi_db> db.app_user.find({$text: {$search: "\"play game\""}})
      
      maisi_db> db.app_user.find({$text: {$search: "电脑"}}, {score: {$meta: "textScore"}}).sort({score: {$meta: "textScore"}})

      注:使用全文检索必须给文档创建text索引,一个文档只能有一个text索引,可以包含多个字段。

      • 使用空格分隔搜索字符串,分割后的多个关键字执行逻辑或;
      • 排除某个关键字,在关键字前加--电脑表示排除文本索引中包含电脑的文档;
      • 短语查询通过双引号组合,双引号需要转义;
      • {$meta: "textScore"}计算并获取文档与检索关键字的相关性匹配得分。
    • 高级查询

      maisi_db> db.app_user.find({"$where": "this.username=='alice'"})
    • 分页

      maisi_db> db.app_user.find().limit(2).skip(0)
    • 排序(1升序,-1降序)

      maisi_db> db.app_user.find().sort({username: 1})
      maisi_db> db.app_user.find().sort({username: -1})
    • 逻辑或

      maisi_db> db.app_user.find({$or: [{username: 'alice'}, {age: {$lt: 30}}]})
  • 更新文档

    maisi_db> db.app_user.updateOne({"username": "bob"}, {$set: {"username": "alice"}})
    {
      acknowledged: true,
      insertedId: null,
      matchedCount: 1,
      modifiedCount: 1,
      upsertedCount: 0
    }

    或者:

    maisi_db> user = db.app_user.findOne({username: 'alice'})
    { _id: ObjectId('6a62d6368378d289b0a26a13'), username: 'alice' }
    maisi_db> user.username = 'bob'
    bob
    maisi_db> db.app_user.replaceOne({_id: user._id}, user, {upsert: true})
    {
      acknowledged: true,
      insertedId: null,
      matchedCount: 1,
      modifiedCount: 1,
      upsertedCount: 0
    }

    upsert: true:当找不到文档时,插入新文档。

    注:mongosh已经废弃了save()方法,save()仅适用于mongo。

    > user = db.app_user.findOne({username: 'alice'})
    > user.username = 'bob'
    > db.app_user.save(user)
  • 删除文档

    > db.app_user.remove({"username": "alice"}, {justOne: true, writeConcern: {w: 0}})
    WriteResult({ })

    justOne:是否只删除一个文档,默认为false,删除符合条件的所有文档,true则只删除一个文档。

    maisi_db> db.app_user.deleteMany({"username": "alice"});
    { acknowledged: true, deletedCount: 1 }
  • 调整文档结构

    • 新增字段

      > db.app_user.update({}, {$set: {age: ''}}, {multi: true})
      WriteResult({ "nMatched" : 2, "nUpserted" : 0, "nModified" : 2 })

      multi: true:默认为false,只更新匹配的第一个文档,true则更新匹配的所有文档。

      maisi_db> db.app_user.updateMany({}, {$set: {age: ''}})
      {
        acknowledged: true,
        insertedId: null,
        matchedCount: 1,
        modifiedCount: 1,
        upsertedCount: 0
      }
    • 删除字段

      > db.app_user.update({}, {$unset: {age: ''}}, {multi: true})
      WriteResult({ "nMatched" : 2, "nUpserted" : 0, "nModified" : 2 })

索引

  • 获取索引

    maisi_db> db.app_user.getIndexes()
    [ { v: 2, key: { _id: 1 }, name: '_id_' } ]
  • 创建索引

    • 排序索引(1升序,-1降序)

      maisi_db> db.app_user.ensureIndex({username: 1})
      [ 'username_1' ]

      或者:

      maisi_db> db.app_user.createIndex({username: 1})
      username_1
    • 复合索引

      maisi_db> db.app_user.ensureIndex({username: 1, age: 1})
      [ 'username_1_age_1' ]
    • 唯一索引

      maisi_db> db.app_user.ensureIndex({username: 1}, {unique: true})
      [ 'username_1' ]
    • 文本索引

      maisi_db> db.app_user.createIndex({skill: 'text'})
      skill_text
  • 删除索引

    • 排序索引

      maisi_db> db.app_user.dropIndex({username: 1})
      { nIndexesWas: 2, ok: 1 }
    • 复合索引

      maisi_db> db.app_user.dropIndex('username_1_age_1')
      { nIndexesWas: 2, ok: 1 }

聚合

db.collection.aggregate()是基于数据处理的聚合管道,每个文档通过管道进行处理后输出结果。

基本语法:db.collection.aggregate(pipeline, options)

  • pipeline:一系列阶段,管道由多个阶段(stage)组成。阶段包括:count、match(筛选)、project(映射)、group(分组)、unwind、sort(排序)、limit(限制)、skip(跳过)、sortByCount、lookup、out和addFields等;
  • options:可选,仅pipeline为数组时才能指定options。

$count

返回管道中的文档数。

maisi_db> db.app_user.aggregate([{$count: "total"}])
[ { total: 2 } ]
maisi_db> db.app_user.aggregate([{$match: {skill: {$regex: '电脑|游戏'}}}, {$count: 'total'}])
[ { total: 1 } ]
  • $match阶段skill包含“电脑”或“游戏”的文档传入下个阶段;
  • $count阶段返回管道中剩余文档的计数,并将该值分配给名为total的字段。

等效$group + $project:

maisi_db> db.app_user.aggregate([{$group: {_id: null, total: { $sum: 1 }}}, {$project: {_id: 0, total: 1}}])
[ { total: 2 } ]

$group

按指定的表达式对文档进行分组,并将分组后的文档输出到下一个阶段。

{$group: {_id: [expression], field: {accumulator: expression, ...}, ...}}

  • _id必填,可以赋值null为整个输入文档计算累计值;
  • 剩余计算字段可选,使用accumulator运算符进行计算;
  • _id和accumulator表达式可以接受任意有效表达式。

accumulator

操作符描述
$avg计算均值
$first返回每组第一个文档,组内按照排序规则(未指定则按照存储顺序)排序
$last返回每组最后一个文档
$max返回每组最大值
$min返回每组最小值
$push将表达式值添加到数组
$addToSet将表达式值添加到集合(无重复值,无序)
$sum计算求和
$stDevPop返回输入值总体标准偏差(population standard deviation)
$stDevSamp返回输入值样本标准偏差(the sample standard deviation)
  • 按年、月、日对订单进行分组,并计算每组总价、平均商品数和订单数

    maisi_db> db.app_order.aggregate([{
      $group: {
        _id: {
          year: {$year: "$order_time"},
          month: {$month: "$order_time"},
          day: {$dayOfMonth: "$order_time"}
        },
        total_price: {$sum: {$multiply: ["$price", "$quantity"]}},
        avg_quantity: {$avg: "$quantity"},
        total: {$sum: 1}
      }
    }])
    [
      {
        _id: { year: 2026, month: 5, day: 15 },
        total_price: 2241.6,
        avg_quantity: 4,
        total: 1
      },
      {
        _id: { year: 2026, month: 6, day: 30 },
        total_price: 8960,
        avg_quantity: 8,
        total: 1
      }
    ]
  • 计算所有订单的总价、平均商品数和订单数

    maisi_db> db.app_order.aggregate([{
      $group: {
        _id: null,
        total_price: {$sum: {$multiply: ["$price", "$quantity"]}},
        avg_quantity: {$avg: "$quantity"},
        total: {$sum: 1}
      }
    }])
    [
      { _id: null, total_price: 144997.95, avg_quantity: 4.35, total: 40 }
    ]
  • 获取所有订单日期

    maisi_db> db.app_order.aggregate([{
      $group: {
        _id: {
          $dateToString: {
            format: "%Y-%m-%d",
            date: "$order_time",
            timezone: "+08:00"
          }
        }
      }
    }])
    [
      { _id: '2026-05-11' }, { _id: '2026-07-08' }
    ]
  • 按日期分组统计订单总数并返回订单总数大于10的分组

    mais_db> db.app_order.aggregate([{
      $group: {
        _id: {
          order_date: {
            year: { $year: "$order_time" },
            month: { $month: "$order_time" },
            day: { $dayOfMonth: "$order_time" }
          }
        },
        total_quantity: { $sum: "$quantity" }
      }
    }, {
      $match: {
        total_quantity: { $gt: 10 }
      }
    }])
    [
      {
        _id: { order_date: { year: 2026, month: 6, day: 18 } },
        total_quantity: 12
      }
    ]
  • 将6月份的订单按日期分组统计分组数

    maisi_db> db.app_order.aggregate([{
      $match: {
        order_time: {
          $gte: ISODate("2026-05-31T16:00:00Z"),
          $lt: ISODate("2026-06-30T16:00:00Z")
        }
      }
    }, {
      $group: {
        _id: {
          order_date: {
            year: { $year: "$order_time" },
            month: { $month: "$order_time" },
            day: { $dayOfMonth: "$order_time" }
          }
        }
      }
    }, {
      $group: {
        _id: null,
        count: { $sum: 1 }
      }
    }])
    [ { _id: null, count: 15 } ]
  • 按用户性别分组,并在每组显示用户名列表和用户列表

    maisi_db> db.app_user.aggregate([{
      $group: {
        _id: "$gender",
        usernames: {
          $push: "$username"
        },
        users: {
          $push: "$$ROOT"
        }
      }
    }])
    [
      {
        _id: 2,
        usernames: [ 'Cindy', 'Grace', 'Helen' ],
        users: [
          {
            _id: ObjectId('6a63d5476077589d45abd7fd'),
            username: 'Cindy',
            gender: 2,
            age: 13
          },
          {
            _id: ObjectId('6a63d5476077589d45abd801'),
            username: 'Grace',
            gender: 2,
            age: 9
          },
          {
            _id: ObjectId('6a63d5476077589d45abd802'),
            username: 'Helen',
            gender: 2,
            age: 14
          }
        ]
      },
      {
        _id: 1,
        usernames: [ 'Alice', 'Bob', 'Dale', 'Eric', 'Frank' ],
        users: [
          {
            _id: ObjectId('6a63d5476077589d45abd7fb'),
            username: 'Alice',
            gender: 1,
            age: 16
          },
          {
            _id: ObjectId('6a63d5476077589d45abd7fc'),
            username: 'Bob',
            gender: 1,
            age: 11
          },
          {
            _id: ObjectId('6a63d5476077589d45abd7fe'),
            username: 'Dale',
            gender: 1,
            age: 10
          },
          {
            _id: ObjectId('6a63d5476077589d45abd7ff'),
            username: 'Eric',
            gender: 1,
            age: 8
          },
          {
            _id: ObjectId('6a63d5476077589d45abd800'),
            username: 'Frank',
            gender: 1,
            age: 18
          }
        ]
      }
    ]
  • 按用户性别分组,获取每组最大年龄和最小年龄

    maisi_db> db.app_user.aggregate([{
      $group: {
        _id: "$gender",
        min_age: { $min: "$age" },
        max_age: { $max: "$age" }
      }
    }])
    [
      { _id: 1, min_age: 8, max_age: 18 },
      { _id: 2, min_age: 9, max_age: 14 }
    ]
  • 按用户性别分组,或每组第一个和最后一个用户

    maisi_db> db.app_user.aggregate([{
      $group: {
        _id: "$gender",
        first: { $first: "$username" },
        last: { $last: "$username" }
      }
    }])
    [
      { _id: 1, first: 'Alice', last: 'Frank' },
      { _id: 2, first: 'Cindy', last: 'Helen' }
    ]

$match

过滤文档,仅将符合条件的文档传递到新一个阶段。

$match查询语法与find()查询语法相同。

  • 简单匹配查询

    maisi_db> db.app_user.aggregate([{
      $match: {
        username: "Alice"
      }
    }])
    [
      {
        _id: ObjectId('6a63d5476077589d45abd7fb'),
        username: 'Alice',
        gender: 1,
        age: 16
      }
    ]
  • 将年龄10-15的用户按性别统计人数

    maisi_db> db.app_user.aggregate([{
      $match: {
        age: { $gte: 10, $lte: 15 }
      }
    }, {
      $group: {
        _id: "$gender",
        count: { $sum: 1 }
      }
    }])
    [ { _id: 1, count: 2 }, { _id: 2, count: 2 } ]

$unwind

将文档数组拆分成单独的文档。

示例文档:

[
  {
    _id: ObjectId('6a63d5476077589d45abd7fb'),
    username: 'Alice',
    gender: 1,
    age: 16,
    skill: [ '电脑', '游戏' ]
  }
]
  • 使用$unwind将skill数组中每个元素单独输出文档

    maisi_db> db.app_user.aggregate([{
      $match: { username: "Alice" }
    }, {
      $unwind: "$skill"
    }])
    [
      {
        _id: ObjectId('6a63d5476077589d45abd7fb'),
        username: 'Alice',
        gender: 1,
        age: 16,
        skill: '电脑'
      },
      {
        _id: ObjectId('6a63d5476077589d45abd7fb'),
        username: 'Alice',
        gender: 1,
        age: 16,
        skill: '游戏'
      }
    ]
  • 显示数组元素的索引

    maisi_db> db.app_user.aggregate([{
      $match: { username: "Alice" }
    }, {
      $unwind: {
        path: "$skill",
        includeArrayIndex: "index"
      }
    }])
    [
      {
        _id: ObjectId('6a63d5476077589d45abd7fb'),
        username: 'Alice',
        gender: 1,
        age: 16,
        skill: '电脑',
        index: Long('0')
      },
      {
        _id: ObjectId('6a63d5476077589d45abd7fb'),
        username: 'Alice',
        gender: 1,
        age: 16,
        skill: '游戏',
        index: Long('1')
      }
    ]

    默认情况下只输出skill有值的文档,如果需要输出不存在skill字段、skill值为null或空数组的文档,可以设置preserveNullAndEmptyArrays为true。

    maisi_db> db.app_user.aggregate([{
      $unwind: {
        path: "$skill",
        preserveNullAndEmptyArrays: true
      }
    }])
    [
      {
        _id: ObjectId('6a63d5476077589d45abd7fb'),
        username: 'Alice',
        gender: 1,
        age: 16,
        skill: '电脑',
        index: Long('0')
      },
      {
        _id: ObjectId('6a63d5476077589d45abd7fb'),
        username: 'Alice',
        gender: 1,
        age: 16,
        skill: '游戏',
        index: Long('1')
      },
      {
        _id: ObjectId('6a63d5476077589d45abd7fc'),
        username: 'Bob',
        gender: 1,
        age: 11
      }
    ]

$project

选择字段、重命名字段和派生字段。

  • 输出文档只包含username

    maisi_db> db.app_user.aggregate([{
      $project: {
        username: 1
      }
    }])
    [
      { _id: ObjectId('6a63d5476077589d45abd7fb'), username: 'Alice' },
      { _id: ObjectId('6a63d5476077589d45abd7fc'), username: 'Bob' },
      { _id: ObjectId('6a63d5476077589d45abd7fd'), username: 'Cindy' },
      { _id: ObjectId('6a63d5476077589d45abd7fe'), username: 'Dale' },
      { _id: ObjectId('6a63d5476077589d45abd7ff'), username: 'Eric' },
      { _id: ObjectId('6a63d5476077589d45abd800'), username: 'Frank' },
      { _id: ObjectId('6a63d5476077589d45abd801'), username: 'Grace' },
      { _id: ObjectId('6a63d5476077589d45abd802'), username: 'Helen' }
    ]

    默认会包含_id字段,设置_id为0以排除_id字段:

    maisi_db> db.app_user.aggregate([{
      $project: {
        _id: 0,
        username: 1
      }
    }])
    [
      { username: 'Alice' },
      { username: 'Bob' },
      { username: 'Cindy' },
      { username: 'Dale' },
      { username: 'Eric' },
      { username: 'Frank' },
      { username: 'Grace' },
      { username: 'Helen' }
    ]
  • 输出排除age字段

    maisi_db> db.app_user.aggregate([{
      $project: {
        age: 0
      }
    }])
    [
      {
        _id: ObjectId('6a63d5476077589d45abd7fb'),
        username: 'Alice',
        gender: 1,
        skill: [ '电脑', '游戏' ]
      },
      {
        _id: ObjectId('6a63d5476077589d45abd7fc'),
        username: 'Bob',
        gender: 1
      }
    ]
  • 排除嵌套文档字段

    maisi_db> db.app_user.aggregate([{
      $project: {
        "region.province": 0
      }
    }])
    [
      {
        _id: ObjectId('6a63d5476077589d45abd7fb'),
        username: 'Alice',
        gender: 1,
        age: 16,
        skill: [ '电脑', '游戏' ],
        region: { city: '南京市' }
      }
    ]
    maisi_db> db.app_user.aggregate([{
      $project: {
        region: {
          province: 0
        }
      }
    }])

    3.6+可以使用REMOVE进行条件移除

    maisi_db> db.app_user.aggregate([{
      $project: {
        "region.city": {
          $cond: {
            if: { $eq: ["南京市", "$region.city"] },
            then: "$$REMOVE",
            else: "$$ROOT"
          }
        }
      }
    }])
  • 返回计算后字段

    maisi_db> db.app_user.aggregate([{
      $project: {
        province: { $substr: [ "$id_card_no", 0, 2] },
        city: { $substr: [ "$id_card_no", 2, 2] },
        district: { $substr: [ "$id_card_no", 4, 2] },
        birthday: { $substr: [ "$id_card_no", 6, 8] },
      }
    }])
    [
      {
        _id: ObjectId('6a63d5476077589d45abd7fb'),
        province: '13',
        city: '23',
        district: '30',
        birthday: '19800101'
      }
    ]

$limit

限制传递到下一个阶段的文档数

maisi_db> db.app_user.aggregate([{
  $limit: 2
}])
[
  {
    _id: ObjectId('6a63d5476077589d45abd7fb'),
    username: 'Alice',
    gender: 1,
    age: 16,
    skill: [ '电脑', '游戏' ],
    region: { province: '江苏省', city: '南京市' },
    id_card_no: '132330198001011211'
  },
  {
    _id: ObjectId('6a63d5476077589d45abd7fc'),
    username: 'Bob',
    gender: 1,
    age: 11
  }
]

$skip

跳过指定数量的文档,将剩余文档传递给下一个阶段

maisi_db> db.app_user.aggregate([{
  $skip: 1
}, {
  $limit: 2
}])
[
  {
    _id: ObjectId('6a63d5476077589d45abd7fc'),
    username: 'Bob',
    gender: 1,
    age: 11
  },
  {
    _id: ObjectId('6a63d5476077589d45abd7fd'),
    username: 'Cindy',
    gender: 2,
    age: 13
  }
]

$sort

对输入文档进行排序(1升序,-1降序),将排序后的结果传递个下一个阶段

maisi_db> db.app_user.aggregate([{
  $sort: { age: 1 }
}, {
  $skip: 1
}, {
  $limit: 2
}])
[
  {
    _id: ObjectId('6a63d5476077589d45abd801'),
    username: 'Grace',
    gender: 2,
    age: 9
  },
  {
    _id: ObjectId('6a63d5476077589d45abd7fe'),
    username: 'Dale',
    gender: 1,
    age: 10
  }
]

$sortByCount

根据表达式的值对文档进行分组,统计各组文档数量,根据文档数量降序排列,输出_id和count值。

maisi_db> db.app_user.aggregate([{
  $sortByCount: "$gender"
}])
[ { _id: 1, count: 5 }, { _id: 2, count: 3 } ]

$lookup

maisi_db> db.app_user.aggregate([{
  $lookup: {
    from: "app_profile",
    localField: "_id",
    foreignField: "user_id",
    as: "profile"
  }
}])
[
  {
    _id: ObjectId('6a63d5476077589d45abd7fb'),
    username: 'Alice',
    gender: 1,
    age: 16,
    skill: [ '电脑', '游戏' ],
    region: { province: '江苏省', city: '南京市' },
    id_card_no: '132330198001011211',
    profile: [
      {
        _id: ObjectId('6a63fd462ba0b4fd98b28930'),
        user_id: ObjectId('6a63d5476077589d45abd7fb'),
        avatar: 'https://i0.hdslb.com/bfs/face/94f8acdde8d111f6d9cc6fe9d450a7c90cd337b8.jpg'
      }
    ]
  },
  {
    _id: ObjectId('6a63d5476077589d45abd7fc'),
    username: 'Bob',
    gender: 1,
    age: 11,
    profile: []
  }
]
  • localField:主表(app_user)中的字段;
  • foreignField:关联表(app_profile)中的字段。

安全

角色

角色类型角色描述
数据库一般角色
Database User Roles
read可以读取所有非系统集合和部分系统集合(system.indexes,system.js和system.namespaces)。
允许调用:collStats、dbHash、dbStats、find、killCursors、listIndexes和listCollections。
readWrite可以读取所有集合,写入所有非系统集合和写入部分系统集合(system.js)。
允许调用:collStats、convertToCapped、createCollection、dbHash、dbStats、dropCollection、createIndex、dropIndex、find、emptycapped、insert、killCurrsors、listIndexes、listCollections、remove、renameCollectionSameDB和update。
数据库管理角色
Database Administration Roles
dbAdmin可以在当前数据库上执行管理函数或部分系统集合上执行部分函数。
允许在system.indexes, system.namespaces, system.profile调用:collStats、dbHash、dbStats、find、killCursors、listIndexes、listCollections。
system.profile还允许调用:dropCollection和createCollection。
在非系统集合允许调用:collMod、collStats、compact、convertToCapped、createCollection、createIndex、dbStats、dropCollection、dropDatabase、dropIndex、enableProfiler、indexStats、reIndex、renameCollectionSameDB、repairDatabase、storageDetails和validate。
userAdmin提供在当前数据库上创建和修改用户和角色的能力。拥有该角色的用户可以给其他用户授予任何权限(包括userAdmin角色)。
允许调用:changeCustomData、changePassword、createRole、createUser、dropRole、dropUser、grantRole、revokeRole、viewRole和viewUser。
dbOwner提供对数据库执行任何管理操作的能力。此角色集合了readWrite,dbAdmin和userAdmin角色授予的权限。
全数据库角色
All-Database Roles
readAnyDatabase在集群的所有数据库上(除local和config数据库)提供与read角色相同的权限,同时提供listDatabases命令权限。
readWriteAnyDatabase在集群的所有数据库上提供与readWrite角色相同的权限,同时提供listDatabases命令权限。
userAdminAnyDatabase在集群中的所有数据库上提供和userAdmin角色相同的权限,此外还提供authSchemaUpgrade、invalidateUserCache和listDatabases权限。此角色还可以在admin数据库的system.users和system.roles执行:collStats、dbHash、dbStats、find、killCursors、planCacheRead、createIndex和dropIndex。
dbAdminAnyDatabase在集群的所有数据库上提供与dbAdmin角色相同的权限,同时提供listDatabases命令权限。
集群管理角色
Cluster Administration Roles
clusterManager提供对群集的管理和监视操作。具有此角色的用户可以访问local和config数据库,分别用于分片和复制。
允许调用:addShard、applicationMessage、cleanupOrphaned、flushRouterConfig、listShards、removeShard、replSetConfigure、replSetGetStatus、replSetStateChange、resync、enableSharding、moveChunk、splitChunk和splitVector。
config数据库还允许调用:insert、remove、update、collStats、dbHash、find和killCursors。
clusterMonitor为监控工具(如MongoDB Cloud Manager或Ops Manager监控代理)提供只读访问权限。
允许调用:connPollStats、cursorInfo、getCmdLineOpts、getLog、getParameter、getShardMap、hostInfo、inprog、listDatabases、lisstShards、netstat、replSetGetStatus、serverStatus、shardingState、top、collStats、dbStats和getShardVersion。
hostManager提供监视和管理服务器的能力。
允许调用:applicationMessage、closeAllDatabases、connPoolSync、cpuProfiler、diagLogging、flushRouterConfig、fsync、invalidateUserCache、killop、logRotate、resync、setParameter、showdown、touch和unlock。
clusterAdmin提供群集管理的最高权限。此角色集合了clusterManager、clusterMonitor和hostManager,还拥有dropDatabase操作权限。
备份和恢复
Backup and Restoration Roles
backup提供备份数据所需的权限。此角色提供足够的权限来使用MongoDB Cloud Manager备份代理,Ops Manager备份代理或使用mongodump
restore提供足够的权限来使用mongorestore
超级角色
Superuser Roles
root提供对所有资源的访问权限。集合了readWriteAnyDatabase、dbAdminAnyDatabase、userAdminAnyDatabase、clusterAdmin、backup和restore。
内部角色__system该角色允许用户对所有数据库拥有所有操作权限,不要将该角色授予应用程序用户或其它管理员用户。

查看某个角色在指定数据库上所拥有的详细权限:

admin> db.runCommand({rolesInfo: {role: "dbAdmin", db: "maisi_db"}, showPrivileges: true})

Write Concern

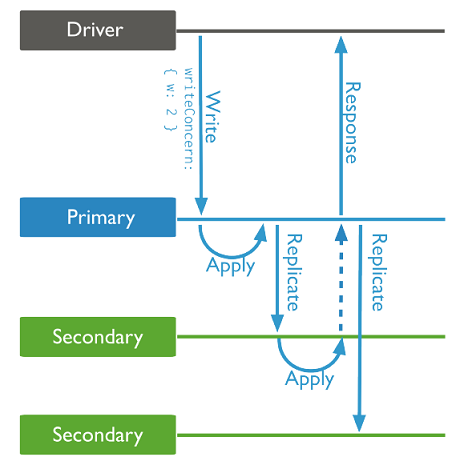
MongoDB Write Concern(MongoDB写入安全机制)是一种客户端设置,用于控制写入安全的级别。Write Concern描述了MongoDB写入到mongod单实例、副本集以及分片集群时何时应答给客户端。默认情况下,mongoDB文档增删改都会一直等待数据库响应(确认写入是否成功),然后才会继续执行。

MongoDB应答机制就是对于当前数据库的写入成功与否告知客户端(db.getLastError())。mongoDB Client发出写入(或更新)请求后,mongoDB Server端开始写入,然后通知客户端是否写入成功。应答机制主要分两种:

  1. 应答式写入,缺省情形,安全写入,适用于数据强一致性场景;
  2. 非应答式写入,非安全写入,适用于数据弱一致性场景。

MongoDB通过Write Concern,客户端调用db.getLastError()方法来获取服务端的返回信息,如果捕获到错误,则可以尝试再次写入或记录到特定日志等。

Write Concern的用法:{ w: <value>, j: <boolean>, wtimeout: <number> }

  • w用以指定写入操作需要确认的节点数量:

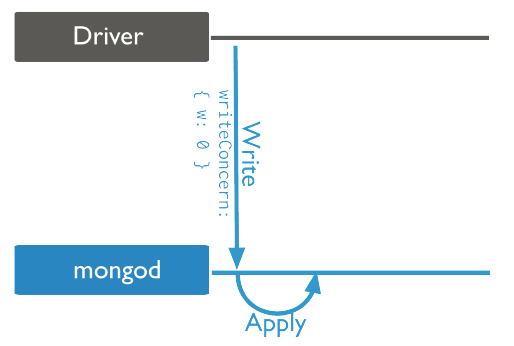
    • w: 0(Unacknowledged),非应答式写入,客户端不等待服务器的任何确认。

      20161024172337968.png

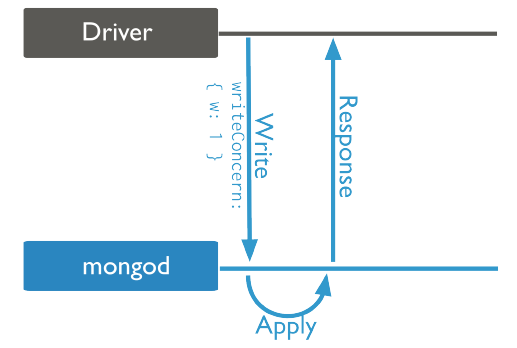
    • w: 1(Acknowledged,默认值),应答式写入,要求主节点确认写入。

      20161024172424766.png

      对于使用副本集的场景,默认情况下仅仅从主节点进行应答,建议修改缺省的应答情形为特定数量或者majority来保证数据的可靠。

      20161024173434123.png

    • w: n(大于1的整数),要求主节点以及至少n-1个从节点确认写入。
    • w: "majority",要求写入操作被副本集中的大多节点确认。
    • w: "自定义",要求写入操作被副本集中指定TAG标记的节点确认。
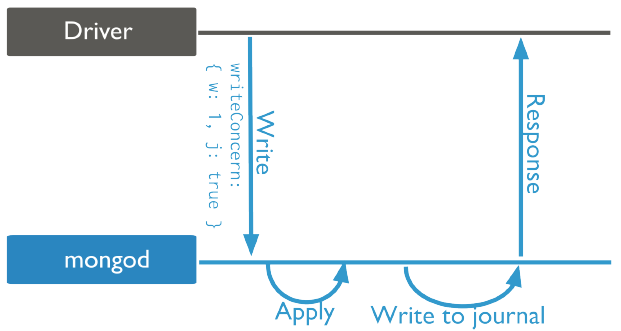
  • j要求确认写入journal日志后应答客户端。

    20161024172513517.png

    注:开启j选项前,必须开启mongodb的日志功能。

  • wtimeout指定时间限制,防止写操作被阻塞导致无法应答给客户端,单位为ms,当w大于1时自动生效。

    仅适用于集群环境,当某个节点写入超出wtimeout后,mongod返回错误。

小结:

  • write concern用于控制写入安全的级别,可以分为应答式写入和非应答式写入;
  • write concern是一个性能和数据强一致性的权衡,应根据业务场景进行设定;
  • 对于强一致性场景,建议w>1或者等于majority,同时j为true,否则w=0;
  • 在副本集的情形下,建议通过配置文件来修改w和wtimeout,以避免由于某个节点挂起导致无法应答。

常见问题

  • Authorization failed

    MongoDB自3.0.3版本之后加入了SCRAM-SHA-1校验方式,之前默认使用MONGODB-CR验证方式。部分客户端端软件在使用用户名和密码连接MongoDB时,默认采用MONGODB-CR校验方式,从而导致授权失败了。

    查看验证方式:

    admin> db.system.version.find()
    { "_id" : "featureCompatibilityVersion", "version" : "4.2" }
    { "_id" : "authSchema", "currentVersion" : 5 }

    authSchema版本为5,即SCRAM-SHA-1校验方式,将authSchema改为3,切换为MONGODB-CR校验方式。

    解决方法(二选一):

    • 升级客户端,使用SCRAM-SHA-1校验方式;
    • 使用低版本MongoDB。

安装Postgres

Docker部署

  1. 拉取镜像

    [root@ecs ~]# docker pull registry.cn-shanghai.aliyuncs.com/maisi/postgres:16.13-alpine
    [root@ecs ~]# docker tag registry.cn-shanghai.aliyuncs.com/maisi/postgres:16.13-alpine postgres:16.13-alpine
    [root@ecs ~]# docker rmi registry.cn-shanghai.aliyuncs.com/maisi/postgres:16.13-alpine
  2. 创建容器

    [root@ecs ~]# docker run --name postgres \
    --privileged=true \
    -e POSTGRES_PASSWORD=wfb88Os2xBk0sUQH \
    -p 5432:5432 \
    -v /data/postgresql:/var/lib/postgresql/data \
    -d postgres:16.13-alpine

PSQL操作

  • 登录Postgres

    [root@ecs ~]# docker exec -it postgres /bin/bash
    dc4d208b728b:/# psql -U postgres;
    psql (16.13)
    Type "help" for help.
    
    postgres=# 

    常见指令说明:

    命令说明
    \l,\l+列出所有数据库
    \du列出所有用户
    \c [db-name]切换数据库
    \d列出数据库内所有内容,包含table、sequence等
    \dt列出数据库内所有表
    \d [table-name]查看表结构
    \q退出登录
  • 创建用户

    postgres=# create user maisi with password 'Ri71kHISuS9mDVBF';
    CREATE ROLE

    或者:

    postgres=# create role maisi password 'Ri71kHISuS9mDVBF' login;
    CREATE USER is now an alias for CREATE ROLE. The only difference is that when the command is spelled CREATE USER, LOGIN is assumed by default, whereas NOLOGIN is assumed when the command is spelled CREATE ROLE.

    create user默认有login权限,而create role默认没有login权限,需要单独指定。

  • 删除用户

    postgres=# drop user maisi;
  • 创建数据库

    postgres=# create database maisi_db with owner maisi;
    CREATE DATABASE
  • 授权数据库

    postgres=# grant all on database maisi_db to maisi;
    GRANT

    这是数据库级别的授权,权限包括:CONNECT(允许连接数据库)、CREATE(允许在数据库创建schema)和TEMPORARY(允许在数据库创建临时表),不会授予任何表的权限,即只能连上数据库,看不到、也操作不了数据库里面的任何表。

  • 授权表

    postgres=# \c maisi_db;
    You are now connected to database "maisi_db" as user "postgres".
    maisi_db=# grant select,insert,update,delete on all tables in schema public to maisi;
    GRANT

    这是表级别的授权,作用对象是public schema下的已存在的所有表。权限包括:SELECT、INSERT、UPDATE和DELETE,不包含TRUNCATE、REFERENCES、TRIGGER等权限。

    注:只对当前已存在的表生效,新建的表不会自动获得授权。

    自动授权新建表

    默认情况下,maisi用户新创建的表,maisi自动拥有所有权限,但如果是其他用户创建的表,maisi用户就没有操作权限了。可以通过alter default privileges将其他用户新创建的表自动授权给maisi用户。

    postgres=# \c maisi_db;
    maisi_db=# alter default privileges in schema public grant select,insert,update,delete on tables to maisi;
    ALTER DEFAULT PRIVILEGES
    maisi_db=# \ddp
             Default access privileges
     Owner | Schema | Type | Access privileges 
    -------+--------+------+-------------------
    (0 rows)

    maisi(被授权用户)=a(INSERT)r(SELECT)w(UPDATE)d(DELETE)/postgres(授权用户):postgres用户在maisi_db数据库下创建的表,自动将arwd权限授权给maisi用户。

  • 撤回表授权

    postgres=# revoke select,insert,update,delete on all tables in schema public from maisi;
    REVOKE
  • 撤回数据库授权

    postgres=# revoke all on database maisi_db from maisi;
    REVOKE
    postgres=# revoke all on database maisi_db from public;
    REVOKE

    注:如果只是revoke from maisi,依旧可以使用psql -U maisi -d maisi_db;登录数据库,因为数据库默认授权给public角色CONNECT权限,必须revoke from public后才可以彻底拒绝maisi用户登录maisi_db数据库。

  • 登录数据库

    maisi_db=# \q
    dc4d208b728b:/# psql -U maisi -d maisi_db;
    psql (16.13)
    Type "help" for help.
    
    maisi_db=> 

    注:不指定数据库的情况下,默认会登录到和用户名同名的数据库。如果数据库名称和用户名不一致,必须指定数据库名称,否则会报错。

  • 创建表

    maisi_db=> create table "user"(
      id serial primary key,
      username varchar(255) unique not null,
      password varchar(50) not null,
      created_at timestamp with time zone default current_timestamp,
      updated_at timestamp with time zone default current_timestamp
    );
    CREATE TABLE
  • 插入记录

    maisi_db=> insert into "user"(username,password) values('root','password');
    INSERT 0 1
  • 导入sql

    dc4d208b728b:/# cat > /tmp/user.sql << 'EOF'
    drop table if exists "user";
    
    create table "user" (
      id serial primary key,
      username varchar(255) unique not null,
      password varchar(60) not null,
      created_at timestamp with time zone default current_timestamp,
      updated_at timestamp with time zone default current_timestamp
    );
    
    create index user_id_idx on "user"(id);
    
    insert into "user"(username, password) values ('admin', '$2b$10$BUli0c.muyCW1ErNJc3jL.vFRFtFJWrT8/GcR4A.sUdCznaXiqFXa');
    EOF
    dc4d208b728b:/# psql -h 127.0.0.1 -p 5432 -U maisi -d maisi_db -W -f /tmp/user.sql

    注:shell中``表示执行命令,并将命令输出替换当前位置,如`user`是执行user命令,但linux没有user命令,因此就会报错。如果需要保留`user`,只需将EOF改成'EOF'即可。

    在postgres中,user是保留关键字,不能直接用来作为表名,如必须使用user作为表名,必须使用""强制转义。

  • 查询记录

    maisi_db=> select * from "user";
  • 删除表

    maisi_db=> drop table "user";
    DROP TABLE
  • 修改数据库所有者

    maisi_db=> \q
    dc4d208b728b:/# psql -U postgres;
    psql (16.13)
    Type "help" for help.
    
    postgres=# alter database maisi_db owner to postgres;
    ALTER DATABASE
    postgres=# select datname,rolname from pg_database d join pg_roles r on d.datdba=r.oid order by d.datname;
      datname  | rolname  
    -----------+----------
     postgres  | postgres
     template0 | postgres
     template1 | postgres
     maisi_db  | postgres
    (4 rows)

    注:修改数据库的所有者后,使用psql -U maisi -d maisi_db;仍可以登录,而且依旧可以用maisi用户对表进行SELECT、INSERT、UPDATE和DELETE操作,这是因为数据库默认会将CONNECT权限授予给PUBLIC角色(所有用户),而且之前grant select,insert,update,delete on all tables in schema public to maisi将表操作权限授予给maisi用户,因此即使更改数据库的所有者,也不影响表授权。

  • 删除数据库

    postgres=# drop database maisi_db;
    DROP DATABASE

    注:如果删除的数据库是当前登录的数据库,则必须先试用\q退出登录,然后登录到postgres后再删除数据库。

命令行操作

  • 创建数据库

    https://www.postgresql.org/docs/current/app-createdb.html

    语法:createdb [connection-option...] [option...] [dbname [description]]

    dc4d208b728b:/# createdb -h 127.0.0.1 -p 5432 -U postgres -e maisi_db "maisi"
    SELECT pg_catalog.set_config('search_path', '', false);
    CREATE DATABASE maisi_db;
    COMMENT ON DATABASE maisi_db IS 'maisi';
    参数值描述
    -h host指定服务器主机名
    -p port指定服务器监听端口
    -U username连接数据库用户名
    -w忽略输入密码(前提是没有设置用户密码)
    -W连接时强制要求输入密码
    非必须,如果用户设置了密码,createdb会自动提示输入密码。但是createdb会先尝试一次连接才发现服务器需要验证密码,造成额外的连接尝试
    -D tablespace指定数据库默认表空间
    -e,--echo显示创建过程中的交互信息
    -E encoding指定数据库编码
    -l locale指定数据库语言
  • 删除数据库

    https://www.postgresql.org/docs/current/app-dropdb.html

    语法:dropdb [connection-option...] [option...] [dbname]

    dc4d208b728b:/# dropdb -h 127.0.0.1 -p 5432 -U postgres maisi_db