分类 Linux 下的文章

CentOS

查看配置

[root@ecs ~]# cat /etc/crontab
SHELL=/bin/bash
PATH=/sbin:/bin:/usr/sbin:/usr/bin
MAILTO=root

# For details see man 4 crontabs

# Example of job definition:
# .---------------- minute (0 - 59)
# |  .------------- hour (0 - 23)
# |  |  .---------- day of month (1 - 31)
# |  |  |  .------- month (1 - 12) OR jan,feb,mar,apr ...
# |  |  |  |  .---- day of week (0 - 6) (Sunday=0 or 7) OR sun,mon,tue,wed,thu,fri,sat
# |  |  |  |  |
# *  *  *  *  * user-name  command to be executed

操作cron

  • 创建定时任务

    [root@ecs ~]# crontab -e
    0 0 */1 * * /data/backup/backup.sh

    :wq保存退出。

    每天00:00执行备份任务

    [root@ecs ~]# echo "0 0 */1 * * root /data/backup/backup.sh" >> /etc/crontab

    或者:

    [root@ecs ~]# cat >> /etc/cron.d/backup << EOF
    SHELL=/bin/bash
    PATH=/sbin:/bin:/usr/sbin:/usr/bin
    0 0 */1 * * root /data/backup/backup.sh
    EOF
    [root@ecs ~]# chmod 600 /etc/cron.d/backup

    测试任务

    [root@ecs ~]# cat > /usr/local/src/test.sh << EOF
    #!/bin/sh
     
    date '+%Y-%m-%d %H:%M:%S' >> /usr/local/src/test.log
    EOF
    [root@ecs ~]# chmod a+x /usr/local/src/test.sh
    [root@ecs ~]# cat > /etc/cron.d/test << EOF
    SHELL=/bin/bash
    */1 * * * * root /usr/local/src/test.sh
    EOF
    [root@ecs ~]# chmod 600 /etc/cron.d/test

    注:

    • cron服务出于安全考虑,要求/etc/cron.d/目录下的文件不能拥有全局写权限,即仅允许执行用户可写(600),否则会在/var/log/cron日志中报错:crond[8162]: (root) BAD FILE MODE (/etc/cron.d/test)
    • /etc/cron.d/下的文件仅是配置文件,因此无需可执行权限。
  • 重启crond服务

    [root@ecs ~]# systemctl restart crond

    修改定时任务后,必须重启crond服务才会生效。

Ubuntu

安装cron

root@ecs:~# apt-get install cron

操作cron

  • 启动服务

    root@ecs:~# /etc/init.d/cron start

    或者:

    root@ecs:~# systemctl enable --now cron
  • 查看是否启动

    root@ecs:~# pgrep cron

    或者:

    root@ecs:~# ps aux | grep cron
  • 关闭服务

    root@ecs:~# /etc/init.d/cron stop
  • 重启服务

    root@ecs:~# /etc/init.d/cron restart
  • 重新加载配置

    root@ecs:~# /etc/init.d/cron reload
  • 添加定时任务

    root@ecs:~# crontab -e
    0 0 */1 * * /data/backup/backup.sh
    root@ecs:~# chmod a+x /data/backup/backup.sh

    crontab -e如果报错:Couldn't find an editor!则需要先安装编辑器:apt-get install nano vim(nano和vim是两个独立的编辑器,选其一即可)。

查看配置

root@ecs:~# cat /etc/crontab
# /etc/crontab: system-wide crontab
# Unlike any other crontab you don't have to run the `crontab'
# command to install the new version when you edit this file
# and files in /etc/cron.d. These files also have username fields,
# that none of the other crontabs do.

SHELL=/bin/sh
# You can also override PATH, but by default, newer versions inherit it from the environment
#PATH=/usr/local/sbin:/usr/local/bin:/sbin:/bin:/usr/sbin:/usr/bin

# Example of job definition:
# .---------------- minute (0 - 59)
# |  .------------- hour (0 - 23)
# |  |  .---------- day of month (1 - 31)
# |  |  |  .------- month (1 - 12) OR jan,feb,mar,apr ...
# |  |  |  |  .---- day of week (0 - 6) (Sunday=0 or 7) OR sun,mon,tue,wed,thu,fri,sat
# |  |  |  |  |
# *  *  *  *  * user-name command to be executed
17 *    * * *   root    cd / && run-parts --report /etc/cron.hourly
25 6    * * *   root    test -x /usr/sbin/anacron || ( cd / && run-parts --report /etc/cron.daily )
47 6    * * 7   root    test -x /usr/sbin/anacron || ( cd / && run-parts --report /etc/cron.weekly )
52 6    1 * *   root    test -x /usr/sbin/anacron || ( cd / && run-parts --report /etc/cron.monthly )
#

时间格式

符号说明
*代表取值范围内的所有数字
/代表每隔(/5,从最小值(0)开始,每隔5个单位)
-代表范围(1-5,表示1到5之间所有值,即1、2、3、4和5)
,代表多个(1,3,5,表示1、3和5)

run-parts

无论是CentOS还是Ubuntu,都可以通过run-parts命令,按顺序运行/etc/cron.hourly/etc/cron.daily/etc/cron.weekly/etc/cron.mouthly四个目录内的所有可执行脚本。

注:

  • run-parts会忽略文件名中包含点号的文件,如脚本文件名为backup.sh则被忽略。
  • 必须赋予脚本可执行权限,否则定时任务无法执行。

CentOS运行机制

  1. crond会自动运行/etc/cron.d/0hourly
  2. /etc/cron.d/0hourly01 * * * * root run-parts /etc/cron.hourly规定每小时的第1分钟执行run-parts /etc/cron.hourly
  3. /etc/cron.hourly/0anacron中执行anacron,anacron会自动调用run-parts执行/etc/cron.daily/etc/cron.weekly/etc/cron.mouthly目录内的所有脚本。

Ubuntu运行机制

执行规则直接定义在/etc/crontab

  • 17 * * * *执行run-parts --report /etc/cron.hourly
  • 25 6 * * *执行run-parts --report /etc/cron.daily
  • 47 6 * * 7执行run-parts --report /etc/cron.weekly
  • 52 6 1 * *执行run-parts --report /etc/cron.monthly

操作run-parts

  • 列出被run-parts识别的脚本

    root@ecs:~# run-parts --test /etc/cron.hourly
  • 手动运行所有hourly脚本

    root@ecs:~# run-parts --verbose /etc/cron.hourly

如果定时任务规定了严格的执行时间,优先建议使用crontab -e/etc/crontab定义任务执行时间,或者在/etc/cron.d/目录中自定义脚本,再在脚本中定义任务执行时间。

如果定时任务只需要每天、每周或每月执行一次,则优先推荐/etc/cron.daily/etc/cron.weekly/etc/cron.monthly目录内创建任务脚本,因为这3个目录内的定时任务使用anacron进行管理。anacron执行定时任务并没有严格的执行时间,而是根据时间间隔来决定下次执行的时间,这对于关机状态下的定时任务非常友好。

例如:一个每周执行一次的计划任务,第一次执行的时间为周一早上09:00,如果使用cron,那么下次执行的时间则是第二周的周一早上09:00,如果第二周的周一早上服务器是处于关闭状态的,那么这个计划任务就无法执行,必须等到第三周的周一早上09:00才会再次执行。

而使用anacron,即使第二周的周一09:00服务器处于关闭状态,接下来假设周二开启了服务器,anacron会检测上次执行的时间是否超过一个星期,一旦超过一个星期就会再次执行。

/etc/cron.daily/etc/cron.weekly/etc/cron.monthly由anacron接管,/etc/cron.daily依旧由cron管理。
更改镜像源

  • Ubuntu 22.4

    maisi@ecs:~$ sudo sed -i 's|http://[a-z0-9\.]*\.archive\.ubuntu\.com|https://mirrors.aliyun.com|g;s|http://security\.ubuntu\.com|https://mirrors.aliyun.com|g' /etc/apt/sources.list
    maisi@ecs:~$ sudo apt update && apt upgrade && apt full-upgrade
  • Ubuntu 24.4

    maisi@ecs:~$ sudo sed -i 's|http://[a-z0-9\.]*\.archive\.ubuntu\.com|https://mirrors.aliyun.com|g;s|http://security\.ubuntu\.com|https://mirrors.aliyun.com|g' /etc/apt/sources.list.d/ubuntu.sources
    maisi@ecs:~$ sudo apt update && apt upgrade && apt full-upgrade

开启root用户

  • 设置root用户密码

    maisi@ecs:~$ sudo passwd root
  • 切换root用户

    maisi@ecs:~$ su -
    Password:
    root@ecs:~# 
  • 开启root ssh登录

    root@ecs:~# sed -i '/#PermitRootLogin/a \PermitRootLogin yes' /etc/ssh/sshd_config
    root@ecs:~# sed -i '/#PasswordAuthentication/a \PasswordAuthentication yes' /etc/ssh/sshd_config
    root@ecs:~# sed -i '/#PermitEmptyPasswords/a \PermitEmptyPasswords no' /etc/ssh/sshd_config
    root@ecs:~# systemctl restart ssh

    如果缺少/etc/ssh/sshd_config,原因是没有安装ssh服务。

    • 查看是否安装ssh

      maisi@ecs:~$ dpkg -l | grep openssh-server
    • 安装openssh

      maisi@ecs:~$ sudo apt update
      maisi@ecs:~$ sudo apt install openssh-server
      maisi@ecs:~$ sudo systemctl enable --now ssh

用户及组

  • 查看所有用户

    root@ecs:~# sudo getent passwd
    root@ecs:~# cat /etc/passwd
  • 查看用户所属组

    root@ecs:~# sudo groups maisi
    maisi : maisi adm cdrom sudo dip plugdev lxd
  • 查看所有组

    root@ecs:~# cat /etc/group
  • 查看组内所有用户

    root@ecs:~# sudo getent group sudo
  • 将用户加入组

    将用户maisi加入sudo、root组

    root@ecs:~# sudo usermod -aG sudo maisi
    root@ecs:~# sudo usermod -aG root maisi
  • 移除组内用户

    root@ecs:~# sudo gpasswd -d maisi root

关闭Shell Integration

Ubuntu 26.04默认启用了Shell Integration,systemd会向终端发送OSC(Operating System Command)控制序列。

格式:08;start=e6c9b7d8-7b8c-4e57-81ff-a15fa02ce61b;machineid=6bb9d3950534460ba96e415cc64f1cd6;user=root;hostname=ubuntu;bootid=1f7bf34f-bbc9-4f40-9782-ad0ed2ce4f0e;pid=00000000000000052777;type=command;cwd=/root

如果SSH客户端不支持OSC,则会在终端直接输出原始代码,可以在Ubuntu关闭Shell Integration。

root@ecs:~$ cat >> ~/.bashrc <<EOF
if [[ -n "$SSH_CONNECTION" ]]; then
    PROMPT_COMMAND=(
        "${PROMPT_COMMAND[@]/__systemd_osc_context_precmdline}"
    )
    PS0=
fi
EOF
root@ecs:~$ source ~/.bashrc

正向代理服务器(Forward proxy)

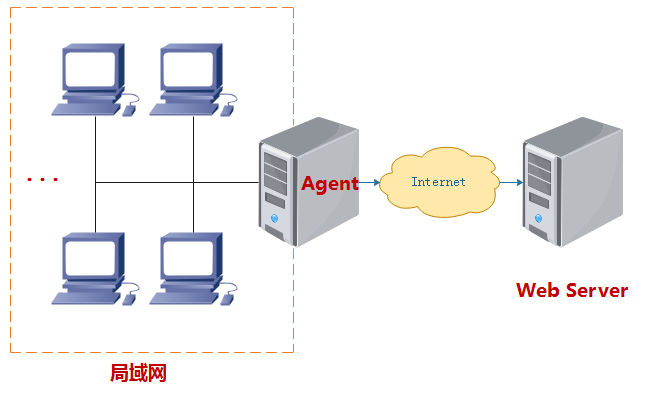
正向代理主要是将内网的访问请求通过代理服务器转发访问并返回结果。通常客户端无法直接访问外部的服务器,客户端通过代理服务器访问外部服务器,需要在客户端的浏览器中设置代理服务器。

5818878522797595407.png

正向代理服务器是客户端的代理,代理服务器代表客户端与真是服务器通讯。

客户端知道真实服务器但不直接访问真实服务器,而是有将请求告知代理服务器,再有代理服务器向真实服务器发起请求。

CentOS 7 Squid搭建代理服务器

  • 安装squid

    [root@ecs ~]# yum install -y squid
  • 指定放行网段

    允许局域网内指定网段的机器使用代理服务器,http_access deny all必须放在最后。

    [root@ecs ~]# cat > /etc/squid/squid.conf << EOF
    acl mynet src 192.168.1.0/24
    
    http_access allow localnet
    http_access allow localhost
    http_access deny all
    EOF
  • 设置监听端口

    [root@ecs ~]# sed -i '/http_port/chttp_port 0.0.0.0:3128' /etc/squid/squid.conf

    0.0.0.0表示监听所有IPv4地址,包括公网IP。

  • 启用用户认证

    [root@ecs ~]# yum install -y httpd-tools
    [root@ecs ~]# htpasswd -c /etc/squid/passwd maisi
    [root@ecs ~]# chown squid:squid /etc/squid/passwd
    [root@ecs ~]# chmod 640 /etc/squid/passwd
    [root@ecs ~]# sed -i '1i\
    auth_param basic program /usr/lib64/squid/basic_ncsa_auth /etc/squid/passwd\
    auth_param basic realm "Squid Proxy Authentication"\
    acl authenticated proxy_auth REQUIRED\
    http_access allow authenticated' /etc/squid/squid.conf

    启用用户认证后,可以注释掉:http_access allow localnet

  • 启动服务

    [root@ecs ~]# systemctl enable --now squid
  • 防火墙放行端口

    [root@ecs ~]# firewall-cmd --permanent --add-port=3128/tcp
    [root@ecs ~]# firewall-cmd --reload

    云服务器(阿里云、华为云等)务必在安全组中放行TCP 3128端口。

  • 查看日志

    [root@ecs ~]# tail -f /var/log/squid/access.log
    [root@ecs ~]# tail -f /var/log/squid/cache.log
  • 客户端测试

    [root@ecs ~]# export http_proxy=http://maisi:yOS4WfuAU0pVtjpt@139.196.100.56:3128
    [root@ecs ~]# curl ifconfig.me

    重要说明:Squid默认支持https访问,但工作方式不同于http。https使用http connect方法,建立到目标https服务器的Tunnel,不解析、不缓存、不修改https数据流,加密与解密仍由客户端与目标服务器完成。

    [root@ecs ~]# curl -v -x http://maisi:yOS4WfuAU0pVtjpt@139.196.100.56:3128 -I https://ipinfo.io
    * About to connect() to proxy 139.196.100.56 port 3128 (#0)
    *   Trying 139.196.100.56...
    * Connected to 139.196.100.56 (139.196.100.56) port 3128 (#0)
    * Establish HTTP proxy tunnel to ipinfo.io:443
    * Proxy auth using Basic with user 'maisi'
    > CONNECT ipinfo.io:443 HTTP/1.1
    > Host: ipinfo.io:443
    > Proxy-Authorization: Basic bWFpc2k6eU9TNFdmdUFVMHBWdGpwdA==
    > User-Agent: curl/7.29.0
    > Proxy-Connection: Keep-Alive
    > 
    < HTTP/1.1 200 Connection established
    HTTP/1.1 200 Connection established
    < 
    
    * Proxy replied OK to CONNECT request
    * Initializing NSS with certpath: sql:/etc/pki/nssdb
    *   CAfile: /etc/pki/tls/certs/ca-bundle.crt
    CApath: none
    * SSL connection using TLS_ECDHE_RSA_WITH_AES_128_GCM_SHA256
    * Server certificate:
    *       subject: CN=ipinfo.io
    *       start date: 8月 01 14:39:08 2026 GMT
    *       expire date: 10月 30 14:39:07 2026 GMT
    *       common name: ipinfo.io
    *       issuer: CN=YR2,O=Let's Encrypt,C=US
    > HEAD / HTTP/1.1
    > User-Agent: curl/7.29.0
    > Host: ipinfo.io
    > Accept: */*
    > 
    < HTTP/1.1 200 OK
    HTTP/1.1 200 OK
    < access-control-allow-origin: *
    access-control-allow-origin: *
    < content-type: application/json
    content-type: application/json
    < Content-Length: 278
    Content-Length: 278
    < date: Sat, 08 Aug 2026 05:04:04 GMT
    date: Sat, 08 Aug 2026 05:04:04 GMT
    < via: 1.1 google
    via: 1.1 google
    < Alt-Svc: h3=":443"; ma=2592000
    Alt-Svc: h3=":443"; ma=2592000
    
    < 
    * Connection #0 to host 139.196.100.56 left intact

    客户端访问Squid,Squid发送CONNECT ipinfo.io:443 HTTP/1.1,与ipinfo.io:443建立tcp连接,之后Squid仅转发原始字节流。

CentOS 7 nginx搭建代理服务器

  • 创建用户

    [root@ecs ~]# mkdir -p /etc/nginx
    [root@ecs ~]# htpasswd -c /etc/nginx/passwd maisi
  • 删除用户

    [root@ecs ~]# htpasswd -D /etc/nginx/passwd maisi
  • nginx配置

    [root@ecs ~]# cat > "/usr/local/nginx/conf/conf.d/proxy.conf" << EOF
    server {
        listen 3128;
        resolver 8.8.8.8 114.114.114.114 valid=30s;
    
        # 启用Basic Auth
        auth_basic "";
        auth_basic_user_file /etc/nginx/passwd;
    
        location / {
            proxy_pass \$scheme://\$http_host\$request_uri;
            proxy_set_header Host \$http_host;
            proxy_set_header X-Real-IP \$remote_addr;
            proxy_set_header X-Forwarded-For \$proxy_add_x_forwarded_for;
            proxy_set_header X-Forwarded-Proto \$scheme;
            proxy_http_version 1.1;
        }
    }
    EOF
  • 客户端测试

    [root@ecs ~]# curl -v -x http://139.196.100.56:3128 -u maisi:yOS4WfuAU0pVtjpt ifconfig.me
    * About to connect() to proxy 139.196.100.56 port 3128 (#0)
    *   Trying 139.196.100.56...
    * Connected to 139.196.100.56 (139.196.100.56) port 3128 (#0)
    * Server auth using Basic with user 'maisi'
    > GET HTTP://ifconfig.me/ HTTP/1.1
    > Authorization: Basic bWFpc2k6eU9TNFdmdUFVMHBWdGpwdA==
    > User-Agent: curl/7.29.0
    > Host: ifconfig.me
    > Accept: */*
    > Proxy-Connection: Keep-Alive
    > 
    < HTTP/1.1 200 OK
    < Server: nginx/1.30.4
    < Date: Sat, 08 Aug 2026 05:36:45 GMT
    < Content-Type: text/plain
    < Content-Length: 14
    < Connection: keep-alive
    < access-control-allow-origin: *
    < via: 1.1 google
    < 
    * Connection #0 to host 139.196.100.56 left intact

    curl -U或者curl -x http://username:password@host:port方式发送的是Proxy-Authorization: Basic,而nginx不认Proxy-Authorization: Basic,因此会报错:401 Authorization Required

    虽然curl -u发送的Authorization: Basic能通过验证,但是客户端默认发送的是Proxy-Authorization: Basic,nginx并不支持,因此不推荐使用nginx作为正向代理服务器

反向代理服务器(Reverse proxy)

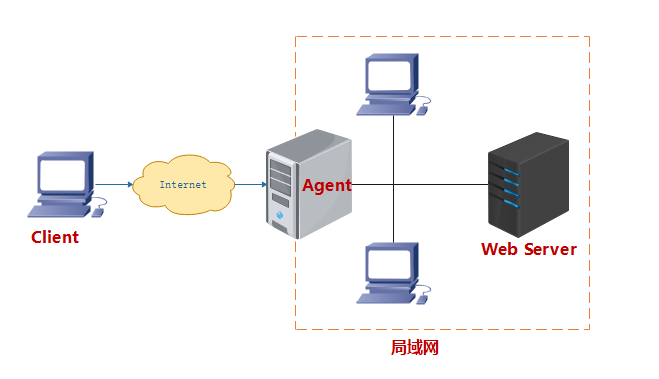
反向代理主要是将外网对代理服务器的访问转发到同局域网的服务器。通常客户端通过外网可以访问代理服务器,但无法访问局域网内的服务器。反向代理对客户端透明,客户端不用做任何设置,因此客户端访问代理就像访问目标服务器一样。

5818878523070222481.png

反向代理服务器是服务端的代理,代理服务器代表服务器与客户端通讯。

  • 查看防火墙状态

    root@ecs:~# ufw status
    Status: inactive
  • 开启防火墙

    root@ecs:~# ufw enable
    Command may disrupt existing ssh connections. Proceed with operation (y|n)? y
    Firewall is active and enabled on system startup
  • 关闭防火墙

    root@ecs:~# ufw disable
    Firewall stopped and disabled on system startup
  • 查看防火墙版本

    root@ecs:~# ufw version
    ufw 0.36.1
    Copyright 2008-2021 Canonical Ltd.
  • 允许外部访问

    root@ecs:~# ufw default allow
    Default incoming policy changed to 'allow'
    (be sure to update your rules accordingly)
  • 拒绝外部访问

    root@ecs:~# ufw default deny
    Default incoming policy changed to 'deny'
    (be sure to update your rules accordingly)
  • 允许外部访问80端口

    root@ecs:~# ufw allow 80
    Rule added
    Rule added (v6)
  • 拒绝外部访问80端口

    root@ecs:~# ufw deny 80
    Rule updated
    Rule updated (v6)
  • 允许指定IP访问本机所有端口

    root@ecs:~# ufw allow from 192.168.1.9
    Rule added

更换yum源

使用阿里云yum源

x86_64 Base

[root@ecs ~]# curl -o /etc/yum.repos.d/CentOS-Base.repo http://mirrors.aliyun.com/repo/Centos-7.repo

x86_64 epel

[root@ecs ~]# curl -o /etc/yum.repos.d/epel-7.repo https://mirrors.aliyun.com/repo/epel-7.repo

注:不推荐使用yum install -y epel-release。epel-release使用https://dl.fedoraproject.org/pub/的软件源,速度较慢。

armv7 Base

[root@ecs ~]# curl -o /etc/yum.repos.d/CentOS-Base.repo http://mirrors.aliyun.com/repo/Centos-altarch-7.repo

armv7 epel

[root@ecs ~]# cat > /etc/yum.repos.d/epel.repo << EOF
[epel]
name=Epel rebuild for armhfp
baseurl=http://armv7.dev.wiseidc.com/repodir/epel-pass-1/
enabled=1
gpgcheck=0
EOF

清空缓存并重新生成缓存

[root@ecs ~]# yum clean all && yum makecache

自建yum源

搭建yum服务器

[root@ecs ~]# yum install -y nginx
[root@ecs ~]# systemctl enable --now nginx
[root@ecs ~]# ln -s /data/sdb1/mirrors /usr/local/nginx/html/mirrors
[root@ecs ~]# ln -s /data/sdb1/mirrors/epel-armv7 /usr/local/nginx/html/repodir/epel-pass-1

应用yum源

[root@ecs ~]# curl -o /etc/yum.repos.d/CentOS-Base.repo http://mirrors.aliyun.com/repo/Centos-7.repo
[root@ecs ~]# sed -i s#http://mirrors.aliyun.com#http://mirrors.wiseidc.com#g /etc/yum.repos.d/CentOS-Base.repo

NTFS操作

挂载分区

[root@ecs ~]# yum install -y ntfs-3g
[root@ecs ~]# mkdir -p /data/sdb1
[root@ecs ~]# mount -t ntfs-3g /dev/sdb1 /data/sdb1

注:挂载还可以使用ntfs-3g /dev/sdb1 /data/sdb1

格式化分区

[root@ecs ~]# yum install -y ntfsprogs
[root@ecs ~]# fdisk /dev/sdb
[root@ecs ~]# mkfs.ntfs /dev/sdb1 -f

注:如果硬盘尚未分区,先使用fdisk /dev/sdb进行分区。(n创建新分区,p创建主分区,由于只创建一个分区,因此起始扇区和结束扇区保持默认,w写入分区表)。

修复分区

有时挂载一个ntfs分区时会报错:

Metadata kept in Windows cache, refused to mount.
Falling back to read-only mount because the NTFS partition is in an unsafe state. Please resume and shutdown Windows fully (no hibernation or fast restarting.)

使用ntfsfix /dev/sdb1进行修复。

安装桌面环境

安装依赖

[root@ecs ~]# yum check-update
[root@ecs ~]# yum -y groupinstall "X Window System"

安装gnome桌面

[root@ecs ~]# yum -y install gnome-classic-session gnome-terminal nautilus-open-terminal liberation-mono-fonts

注:

  • gnome-classic-session:桌面会话
  • gnome-terminal:终端工具
  • nautilus-open-terminal:右键打开终端
  • liberation-mono-fonts:终端字体

或者直接安装GNOME Desktop:

[root@ecs ~]# yum groupinstall 'GNOME Desktop' -y

设置运行级别

[root@ecs ~]# unlink /etc/systemd/system/default.target
[root@ecs ~]# ln -sf /lib/systemd/system/graphical.target /etc/systemd/system/default.target
[root@ecs ~]# reboot

还原为多用户终端方式登录

[root@ecs ~]# unlink /etc/systemd/system/default.target
[root@ecs ~]# ln -sf /lib/systemd/system/multi-user.target /etc/systemd/system/default.target

终端使用文件管理器打开当前目录

[root@ecs ~]# nautilus .

安装RDP

  1. 关闭SELinux

    临时关闭

    [root@ecs ~]# setenforce 0
    [root@ecs ~]# getenforce

    系统会进入宽容模式(Permissive),此时SELinux仅记录违规行为,而不强制拦截操作,重启后恢复默认配置(Enforcing)。

    永久关闭

    [root@ecs ~]# sed -i "/^SELINUX=enforcing/cSELINUX=disabled" /etc/selinux/config
  2. 安装xrdp

    [root@ecs ~]# yum install -y xrdp
  3. 配置防火墙

    [root@ecs ~]# firewall-cmd --permanent --zone=public --add-port=3389/tcp
    [root@ecs ~]# firewall-cmd --reload
  4. 启动xrdp并设置自启动

    [root@ecs ~]# systemctl enable --now xrdp

中文支持

  1. 安装语言包

    [root@ecs ~]# yum -y install kde-l10n-Chinese
    [root@ecs ~]# yum -y install google-noto-sans-traditional-chinese-fonts google-noto-sans-simplified-chinese-fonts
    [root@ecs ~]# yum -y install chkfontpath-2.0.3-alt1.x86_64.rpm fonts-chinese-3.02-12.el5.noarch.rpm

    注:fonts-ISO8859-2-75dpi-1.0-17.1.noarch.rpm包含一套75dpi的中欧字体。

    或者:yum -y groupinstall fonts

  2. 查看是否支持中文

    [root@ecs ~]# locale -a | grep zh
  3. 切换系统语言

    [root@ecs ~]# sed -i "/^LANG=\"en_US.UTF-8\"/cLANG=\"zh_CN.UTF-8\"" /etc/locale.conf
    [root@ecs ~]# reboot

    或者:localectl set-locale LANG=zh_CN.UTF-8

安装常用软件

上传下载

[root@ecs ~]# yum install -y lrzsz
[root@ecs ~]# cd /usr/local/src/ && rz
[root@ecs ~]# sz output.jpg
  • rz上传文件,需要再服务器端先切换到上传目录。
  • sz下载文件,SecureCRT会自动下载到~/Documents(修改方式:在服务器连接上右击->Properties->Terminal->X/Y/Zmodem->Directories->修改Download目录即可)。

chrome

[root@ecs ~]# yum localinstall google-chrome-stable_current_x86_64.rpm
[root@ecs ~]# cp google-chrome.desktop ~/Desktop
[root@ecs ~]# chmod a+x ~/Desktop/google-chrome.desktop
[root@ecs ~]# sed -i '/Exec=/s/$/ --no-sandbox/g' ~/Desktop/google-chrome.desktop

Firefox

[root@ecs ~]# yum install -y firefox

向日葵远程

[root@ecs ~]# yum install -y libappindicator-gtk3 libXScrnSaver-devel
[root@ecs ~]# rpm -ivh /usr/local/src/SunloginClient_15.2.0.63064_x86_64.rpm

Visual Studio Code

[root@ecs ~]# cat > /etc/yum.repos.d/vscode.repo <<EOF
[code]
name=Visual Studio Code
baseurl=https://packages.microsoft.com/yumrepos/vscode
enabled=0
gpgcheck=1
gpgkey=https://packages.microsoft.com/keys/microsoft.asc
EOF
[root@ecs ~]# yum install -y xdg-utils
[root@ecs ~]# rpm -ivh code-1.74.3-1673284922.el7.x86_64.rpm
[root@ecs ~]# echo $'alias code=\'code --no-sandbox --user-data-dir="/root/.vscode"\'' >> ~/.bashrc
[root@ecs ~]# source ~/.bashrc
[root@ecs ~]# code

或者:sh -c 'echo -e "[code]\n" > /etc/yum.repos.d/vscode.repo'

Code::Blocks

安装软件

  1. 安装依赖

    [root@ecs ~]# yum install -y wxGTK xterm

    注:xterm也可以不安装,可以使用gnome-terminal。

    查找依赖:

    [root@ecs ~]# repoquery --nvr --whatprovides libwx_gtk2u*
    compat-wxGTK3-gtk2-gl-3.0.2-32.5.el7
    wxGTK-gl-2.8.12-20.el7
    wxGTK-media-2.8.12-20.el7
    compat-wxGTK3-gtk2-media-3.0.2-32.5.el7
    wxGTK-2.8.12-20.el7
    compat-wxGTK3-gtk2-3.0.2-32.5.el7
  2. 安装codeblocks

    [root@ecs ~]# rpm -ivh codeblocks-libs-20.03-1.el7.x86_64.rpm
    [root@ecs ~]# rpm -ivh codeblocks-20.03-1.el7.x86_64.rpm
  3. 安装c++编译器

    [root@ecs ~]# yum install -y gcc-c++

软件设置

  • 修改终端

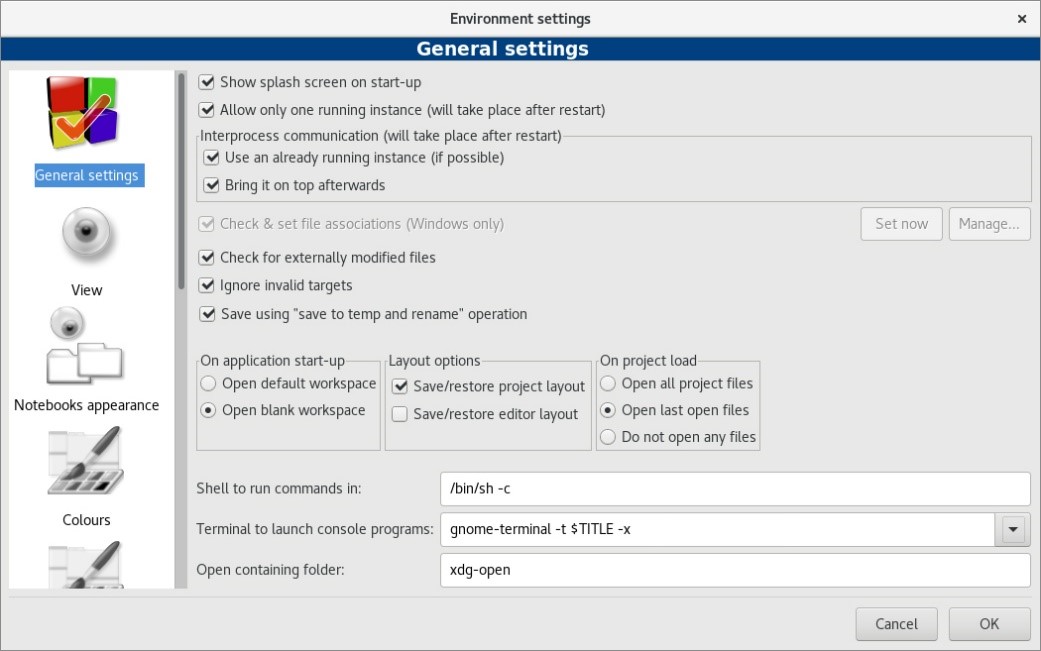
    Code::blocks默认的运行终端为XTerm,当C++程序中输出中文时,XTerm显示为乱码,需要将运行终端修改为gnome-terminal。

    打开Code::blocks ,依次点击:Settings->Environment,打开Environment Settings对话框,切换到General settings

    Terminal to launch console programs:的值由xterm -T $TITLE -e改为:gnome-terminal -t $TITLE -x

VLC

  1. 安装rpm fusion软件源仓库

    [root@ecs ~]# yum install -y rpmfusion-free-release-7.noarch.rpm
  2. 安装vlc

    [root@ecs ~]# yum install -y vlc
  3. 修改运行用户

    默认情况下以root用户方式运行vlc会报错:

    VLC is not supposed to be run as root. Sorry.
    If you need to use real-time priorities and/or privileged TCP ports
    you can use vlc-wrapper (make sure it is Set-UID root and
    cannot be run by non-trusted users first).

    解决方法:

    [root@ecs ~]# sed -i 's/geteuid/getppid/' /usr/bin/vlc
  4. 设置声卡自启动

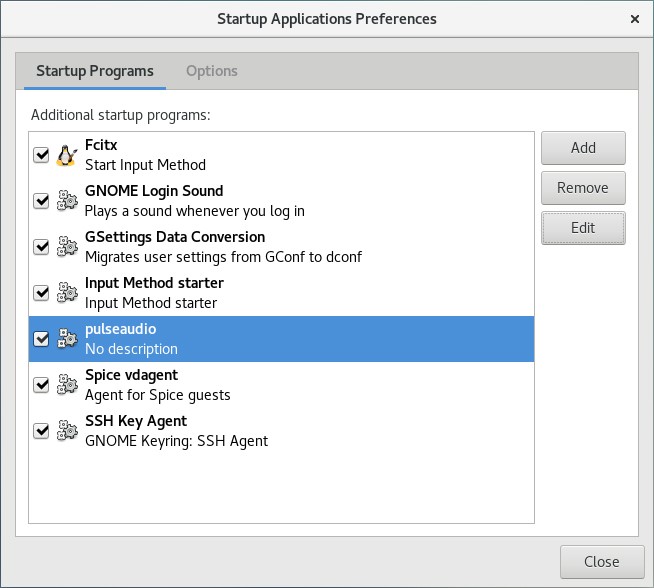
    [root@ecs ~]# gnome-session-properties

    打开Startup Applications Preferences

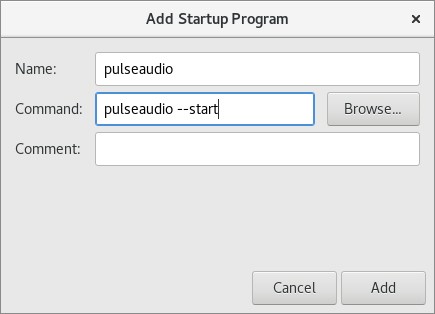
    点击“Add”,添加自启动程序:

    • Name:pulseaudio
    • Command:pulseaudio --start

安装搜狗输入法

  1. 卸载ibus

    Fcitx(小企鹅输入法)是在X Window中使用的输入法框架,Gnome自带了ibus输入法框架,为了防止与Fcitx冲突需要先卸载ibus。

    [root@ecs ~]# rpm -e --nodeps ibus
  2. 安装fcitx

    [root@ecs ~]# yum -y install fcitx fcitx-configtool
    [root@ecs ~]# yum -y install fcitx-pinyin fcitx-table-chinese
    • fcitx-pinyin:拼音输入法
    • fcitx-table-chinese:五笔输入法
  3. 删除输入源

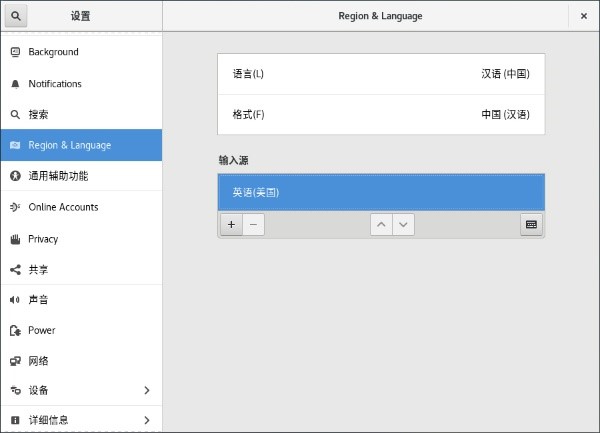
    应用程序->系统设置->设置->Region & Language:

    除了“英语(美国)”,其它输入源都删除,以防止出现输入乱码。

  4. 设置自启动

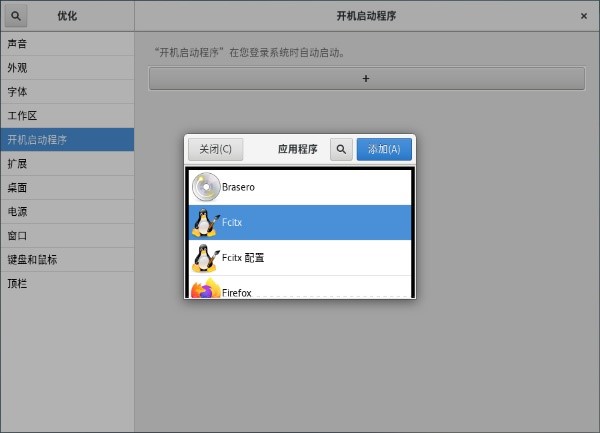
    [root@ecs ~]# yum install -y gnome-tweak-tool

    应用程序->附件->优化->开机启动程序,添加Fcitx。

  5. 安装搜狗输入法

    [root@ecs ~]# yum install -y qtwebkit alien
    [root@ecs ~]# alien -r --scripts sogoupinyin_2.2.0.0108_amd64.deb
    [root@ecs ~]# rpm -ivh --force sogoupinyin-2.2.0.0108-2.x86_64.rpm
    [root@ecs ~]# cp /usr/lib/x86_64-linux-gnu/fcitx/fcitx-sogoupinyin.so /usr/lib64/fcitx/
    [root@ecs ~]# cp /usr/lib/x86_64-linux-gnu/fcitx/fcitx-punc-ng.so /usr/lib64/fcitx/
    [root@ecs ~]# cat >> ~/.bashrc << EOF
    export GTK_IM_MODULE=fcitx
    export QT_IM_MODULE=fcitx
    export XMODIFIERS=@im=fcitx
    EOF
    [root@ecs ~]# source ~/.bashrc
    [root@ecs ~]# reboot
    • fcitx-punc-ng.so:中文标点符号
  6. 添加输入法(必须在图形界面打开)

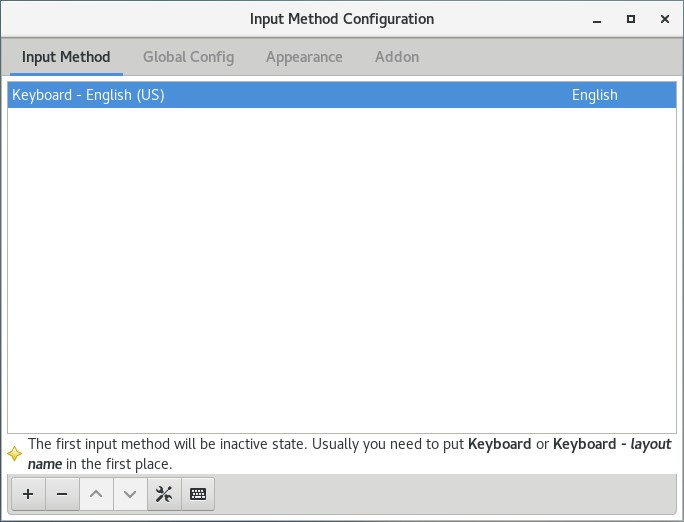
    [root@ecs ~]# fcitx-configtool

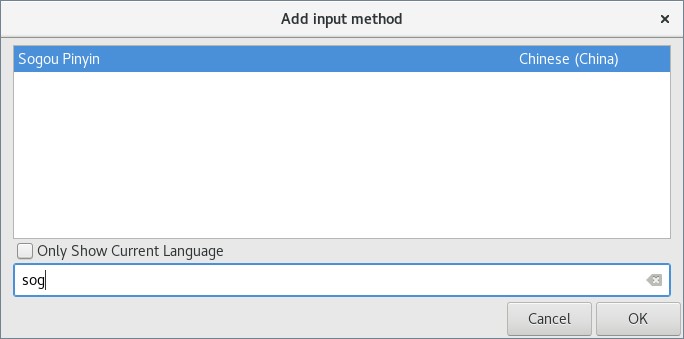
    取消勾选“Only Show Current Language”,输入“sogou”搜索搜狗输入法。