admin 发布的文章
代理服务器搭建指南
正向代理服务器(Forward proxy)
正向代理主要是将内网的访问请求通过代理服务器转发访问并返回结果。通常客户端无法直接访问外部的服务器,客户端通过代理服务器访问外部服务器,需要在客户端的浏览器中设置代理服务器。
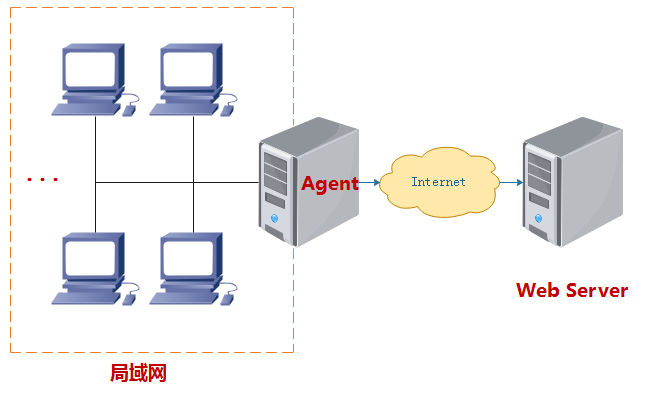
正向代理服务器是客户端的代理,代理服务器代表客户端与真是服务器通讯。
客户端知道真实服务器但不直接访问真实服务器,而是有将请求告知代理服务器,再有代理服务器向真实服务器发起请求。
CentOS 7 Squid搭建代理服务器
安装squid
[root@ecs ~]# yum install -y squid指定放行网段
允许局域网内指定网段的机器使用代理服务器,
http_access deny all必须放在最后。[root@ecs ~]# cat > /etc/squid/squid.conf << EOF acl mynet src 192.168.1.0/24 http_access allow localnet http_access allow localhost http_access deny all EOF设置监听端口
[root@ecs ~]# sed -i '/http_port/chttp_port 0.0.0.0:3128' /etc/squid/squid.conf0.0.0.0表示监听所有IPv4地址,包括公网IP。启用用户认证
[root@ecs ~]# yum install -y httpd-tools
[root@ecs ~]# htpasswd -c /etc/squid/passwd maisi
[root@ecs ~]# chown squid:squid /etc/squid/passwd
[root@ecs ~]# chmod 640 /etc/squid/passwd
[root@ecs ~]# sed -i '1i\
auth_param basic program /usr/lib64/squid/basic_ncsa_auth /etc/squid/passwd\
auth_param basic realm "Squid Proxy Authentication"\
acl authenticated proxy_auth REQUIRED\
http_access allow authenticated' /etc/squid/squid.conf
启用用户认证后,可以注释掉:
http_access allow localnet。启动服务
[root@ecs ~]# systemctl enable --now squid防火墙放行端口
[root@ecs ~]# firewall-cmd --permanent --add-port=3128/tcp
[root@ecs ~]# firewall-cmd --reload
云服务器(阿里云、华为云等)务必在安全组中放行TCP 3128端口。
查看日志
[root@ecs ~]# tail -f /var/log/squid/access.log
[root@ecs ~]# tail -f /var/log/squid/cache.log
客户端测试
[root@ecs ~]# export http_proxy=http://maisi:yOS4WfuAU0pVtjpt@139.196.100.56:3128 [root@ecs ~]# curl ifconfig.me重要说明:Squid默认支持https访问,但工作方式不同于http。https使用http connect方法,建立到目标https服务器的Tunnel,不解析、不缓存、不修改https数据流,加密与解密仍由客户端与目标服务器完成。
[root@ecs ~]# curl -v -x http://maisi:yOS4WfuAU0pVtjpt@139.196.100.56:3128 -I https://ipinfo.io
* About to connect() to proxy 139.196.100.56 port 3128 (#0)
*   Trying 139.196.100.56...
* Connected to 139.196.100.56 (139.196.100.56) port 3128 (#0)
* Establish HTTP proxy tunnel to ipinfo.io:443
* Proxy auth using Basic with user 'maisi'
> CONNECT ipinfo.io:443 HTTP/1.1
> Host: ipinfo.io:443
> Proxy-Authorization: Basic bWFpc2k6eU9TNFdmdUFVMHBWdGpwdA==
> User-Agent: curl/7.29.0
> Proxy-Connection: Keep-Alive
>
< HTTP/1.1 200 Connection established
HTTP/1.1 200 Connection established
<

* Proxy replied OK to CONNECT request
* Initializing NSS with certpath: sql:/etc/pki/nssdb
*   CAfile: /etc/pki/tls/certs/ca-bundle.crt
CApath: none
* SSL connection using TLS_ECDHE_RSA_WITH_AES_128_GCM_SHA256
* Server certificate:
*       subject: CN=ipinfo.io
*       start date: 8月 01 14:39:08 2026 GMT
*       expire date: 10月 30 14:39:07 2026 GMT
*       common name: ipinfo.io
*       issuer: CN=YR2,O=Let's Encrypt,C=US
> HEAD / HTTP/1.1
> User-Agent: curl/7.29.0
> Host: ipinfo.io
> Accept: */*
>
< HTTP/1.1 200 OK
HTTP/1.1 200 OK
< access-control-allow-origin: *
access-control-allow-origin: *
< content-type: application/json
content-type: application/json
< Content-Length: 278
Content-Length: 278
< date: Sat, 08 Aug 2026 05:04:04 GMT
date: Sat, 08 Aug 2026 05:04:04 GMT
< via: 1.1 google
via: 1.1 google
< Alt-Svc: h3=":443"; ma=2592000
Alt-Svc: h3=":443"; ma=2592000

<
* Connection #0 to host 139.196.100.56 left intact
客户端访问Squid,Squid发送
CONNECT ipinfo.io:443 HTTP/1.1,与ipinfo.io:443建立tcp连接,之后Squid仅转发原始字节流。
CentOS 7 nginx搭建代理服务器
创建用户
[root@ecs ~]# mkdir -p /etc/nginx
[root@ecs ~]# htpasswd -c /etc/nginx/passwd maisi
删除用户
[root@ecs ~]# htpasswd -D /etc/nginx/passwd maisinginx配置
[root@ecs ~]# cat > "/usr/local/nginx/conf/conf.d/proxy.conf" << EOF
server {
    listen 3128;
    resolver 8.8.8.8 114.114.114.114 valid=30s;

    # 启用Basic Auth
    auth_basic "";
    auth_basic_user_file /etc/nginx/passwd;

    location / {
        proxy_pass \$scheme://\$http_host\$request_uri;
        proxy_set_header Host \$http_host;
        proxy_set_header X-Real-IP \$remote_addr;
        proxy_set_header X-Forwarded-For \$proxy_add_x_forwarded_for;
        proxy_set_header X-Forwarded-Proto \$scheme;
        proxy_http_version 1.1;
    }
}
EOF
客户端测试
[root@ecs ~]# curl -v -x http://139.196.100.56:3128 -u maisi:yOS4WfuAU0pVtjpt ifconfig.me
* About to connect() to proxy 139.196.100.56 port 3128 (#0)
*   Trying 139.196.100.56...
* Connected to 139.196.100.56 (139.196.100.56) port 3128 (#0)
* Server auth using Basic with user 'maisi'
> GET HTTP://ifconfig.me/ HTTP/1.1
> Authorization: Basic bWFpc2k6eU9TNFdmdUFVMHBWdGpwdA==
> User-Agent: curl/7.29.0
> Host: ifconfig.me
> Accept: */*
> Proxy-Connection: Keep-Alive
>
< HTTP/1.1 200 OK
< Server: nginx/1.30.4
< Date: Sat, 08 Aug 2026 05:36:45 GMT
< Content-Type: text/plain
< Content-Length: 14
< Connection: keep-alive
< access-control-allow-origin: *
< via: 1.1 google
<
* Connection #0 to host 139.196.100.56 left intact
curl -U或者curl -x http://username:password@host:port方式发送的是Proxy-Authorization: Basic,而nginx不认Proxy-Authorization: Basic,因此会报错:401 Authorization Required。虽然
curl -u发送的Authorization: Basic能通过验证,但是客户端默认发送的是Proxy-Authorization: Basic,nginx并不支持,因此不推荐使用nginx作为正向代理服务器。
反向代理服务器(Reverse proxy)
反向代理主要是将外网对代理服务器的访问转发到同局域网的服务器。通常客户端通过外网可以访问代理服务器,但无法访问局域网内的服务器。反向代理对客户端透明,客户端不用做任何设置,因此客户端访问代理就像访问目标服务器一样。
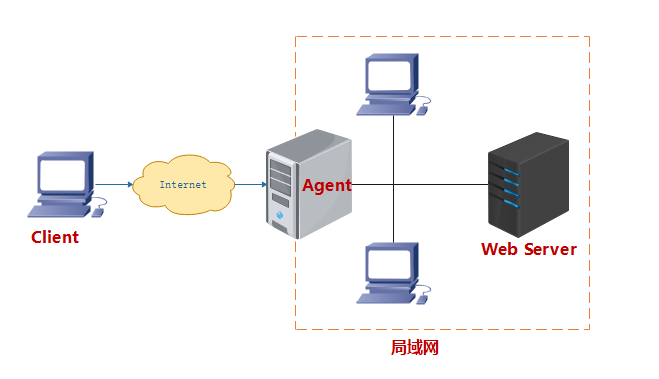
反向代理服务器是服务端的代理,代理服务器代表服务器与客户端通讯。
nginx安装与配置详解
安装
CentOS 7.9
安装依赖
[root@ecs ~]# yum install -y gcc pcre-devel openssl-devel安装nginx
[root@ecs ~]# groupadd www && useradd -g www www -s /sbin/nologin [root@ecs ~]# cd /usr/local/src [root@ecs src]# tar -zxvf nginx-1.30.1.tar.gz && cd nginx-1.30.1 [root@ecs src]# ./configure --prefix=/usr/local/nginx \ --with-http_ssl_module \ --with-http_stub_status_module \ --with-http_gzip_static_module \ --user=www --group=www [root@ecs src]# make && make install- nginx安装时依赖pcre、openssl和zlib模块。使用
yum install -y pcre-devel openssl-devel安装这3个模块(安装openssl-devel会安装依赖zlib-devel),nginx会自动查找依赖模块。 - 如果不想安装这些依赖模块,可以使用
--with-pcre=、--with-openssl=和--with-zlib=指定模块源码路径。
模块说明:
模块 说明 pcre 提供正则表达式支持,rewrite模块依赖PCRE库,编译pcre依赖gcc-c++。
下载地址:https://sourceforge.net/projects/pcre/files/pcre/8.45/pcre-8.45.tar.bz2/downloadopenssl --with-http_ssl_module启用ssl模块,依赖openssl。
下载地址:https://www.openssl.org/source/openssl-1.1.1v.tar.gzzlib 文件压缩和解压缩的库,使用zlib对http数据包进行gzip压缩和解压缩。
下载地址:https://zlib.net/fossils/zlib-1.3.1.tar.gz模块源码安装
[root@ecs ~]# yum install -y bzip2 gcc-c++ [root@ecs ~]# cd /usr/local/src [root@ecs src]# tar -jxvf pcre-8.45.tar.bz2 [root@ecs src]# tar -zxvf openssl-1.1.1v.tar.gz [root@ecs src]# tar -zxvf zlib-1.3.1.tar.gz [root@ecs src]# groupadd www && useradd -g www www -s /sbin/nologin [root@ecs src]# tar -zxvf nginx-1.30.4.tar.gz && cd nginx-1.30.4 [root@ecs src]# ./configure --prefix=/usr/local/nginx \ --with-http_ssl_module \ --with-http_stub_status_module \ --with-http_gzip_static_module \ --with-pcre=/usr/local/src/pcre-8.45 \ --with-zlib=/usr/local/src/zlib-1.3.1 \ --with-openssl=/usr/local/src/openssl-1.1.1v \ --user=www --group=www [root@ecs src]# make && make install- nginx安装时依赖pcre、openssl和zlib模块。使用
开放防火墙端口
[root@ecs ~]# firewall-cmd --zone=public --add-port=80/tcp --permanent
[root@ecs ~]# firewall-cmd --zone=public --add-port=443/tcp --permanent
[root@ecs ~]# firewall-cmd --reload
开机自启动
[root@ecs ~]# sed -i '/#pid/apid logs/nginx.pid;' /usr/local/nginx/conf/nginx.conf
[root@ecs ~]# cat > /usr/lib/systemd/system/nginx.service <<EOF
[Unit]
Description=The nginx HTTP and reverse proxy server
After=network-online.target remote-fs.target nss-lookup.target
Wants=network-online.target

[Service]
Type=forking
PIDFile=/usr/local/nginx/logs/nginx.pid
ExecStartPre=/usr/local/nginx/sbin/nginx -t
ExecStart=/usr/local/nginx/sbin/nginx
ExecReload=/usr/local/nginx/sbin/nginx -s reload
ExecStop=/usr/local/nginx/sbin/nginx -s quit
KillSignal=SIGQUIT
TimeoutStopSec=5
KillMode=process
PrivateTmp=true

[Install]
WantedBy=multi-user.target
EOF
[root@ecs ~]# chmod a+x /usr/lib/systemd/system/nginx.service
[root@ecs ~]# systemctl enable --now nginx
设置虚拟主机
[root@ecs ~]# mkdir -p /usr/local/nginx/conf/conf.d
[root@ecs ~]# sed -i '/^http {$/,/^}$/ {
/^}$/ i\    include /usr/local/nginx/conf/conf.d/*.conf;
}' /usr/local/nginx/conf/nginx.conf
[root@ecs ~]# mkdir -p /data/{wwwroot,wwwlog}
[root@ecs ~]# cat > /usr/local/nginx/conf/conf.d/wiseidc.conf <<EOF
log_format wiseidc '$remote_addr - $remote_user [$time_local] "$request" $status $body_bytes_sent "$http_referer" "$http_user_agent" "$http_x_forwarded_for"';

server {
    listen 80;
    server_name wiseidc.com www.wiseidc.com;
    return 301 https://$server_name$request_uri;
}

server {
    listen 443 ssl;
    ssl_certificate /etc/letsencrypt/live/wiseidc.com/fullchain.pem;
    ssl_certificate_key /etc/letsencrypt/live/wiseidc.com/privkey.pem;
    ssl_session_timeout 5m;
    ssl_protocols TLSv1 TLSv1.1 TLSv1.2;
    ssl_ciphers ECDHE-RSA-AES128-GCM-SHA256:HIGH:!aNULL:!MD5:!RC4:!DHE;
    ssl_prefer_server_ciphers on;

    server_name wiseidc.com www.wiseidc.com;

    root /data/wwwroot/wiseidc;

    location / {
        proxy_pass http://127.0.0.1:8000;
        proxy_set_header Host $host;
        proxy_set_header X-Real-IP $remote_addr;
        proxy_set_header X-Forwarded-For $proxy_add_x_forwarded_for;
        proxy_set_header X-Forwarded-Proto $scheme;
    }

    client_max_body_size 2M;
    location ~ .*\.(php|php5)?$ {
        fastcgi_pass 127.0.0.1:9000;
        fastcgi_index index.php;
        fastcgi_param SCRIPT_FILENAME $document_root$fastcgi_script_name;
        include fastcgi_params;
    }
    location ~ .*\.(gif|jpg|jpeg|png|bmp|swf)$ {
        expires 30d;
    }
    location ~ .*\.(js|css)?$ {
        expires 12h;
    }
    location / {
        index index.html index.htm index.php;
        if (!-e $request_filename) {
            rewrite ^(.*)$ /index.php/$1 last;
            break;
        }
        if (!-e $request_filename) {
            rewrite ^/index.php/(.*)$ /index.php?$1 last;
            break;
        }
    }

    access_log /data/wwwlog/wiseidc.log wiseidc;
}
EOF
/^http {$/,/^}$/:匹配第一个http {所在行到第一个}所在行之间的所有行。/A/,/B/ {}:对A到B范围内的行执行{}内的命令。/^}$/ i\:在}所在行前插入。
禁止IP访问
[root@ecs ~]# sed -i '/^[[:space:]]*server[[:space:]]*{/i\
    server {\
        listen 80;\
        server_name localhost;\
        deny all;\
    }\
' /usr/local/nginx/conf/nginx.conf
或者:
[root@ecs ~]# sed -i '0,/server_name  localhost;/{
/localhost;$/a\        deny all;
}' /usr/local/nginx/conf/nginx.conf
部署网站
[root@ecs wwwroot]# scp root@172.22.159.123:/data/wwwroot/wiseidc.tar.gz /data/wwwroot/
[root@ecs wwwroot]# tar -zxvf wiseidc.tar.gz
[root@ecs wwwroot]# chown -R www:www /data/wwwroot/wiseidc
[root@ecs wwwroot]# chmod -R 550 /data/wwwroot/wiseidc
[root@ecs wwwroot]# cd /data/wwwroot/wiseidc
[root@ecs wiseidc]# chmod -R 770 index.html caches/ uploadfile/ phpsso_server/
[root@ecs wiseidc]# echo "open_basedir=/data/wwwroot/wiseidc/:/tmp/" >> .user.ini
[root@ecs wiseidc]# chattr +i .user.ini
Ubuntu
apt安装
安装nginx
maisi@ecs:~$ apt-get install nginx
maisi@ecs:~$ nginx -v
nginx version: nginx/1.18.0 (Ubuntu)
启动nginx
maisi@ecs:~$ systemctl enable --now nginx
maisi@ecs:~$ systemctl status nginx
防火墙放行端口
maisi@ecs:~$ sudo ufw allow 80/tcp
maisi@ecs:~$ sudo ufw allow 443/tcp
或者:
maisi@ecs:~$ sudo sudo ufw allow http
maisi@ecs:~$ sudo sudo ufw allow https
常见目录说明
路径 说明 /usr/sbin/nginx 主程序 /etc/nginx 存放配置文件 /usr/share/nginx 存放静态文件 /var/log/nginx 存放日志
源码编译安装
安装依赖
maisi@ecs:~$ apt-get install make gcc zlib1g-dev libpcre3-dev libssl-devUbuntu 26.04
maisi@ecs:~$ apt install zlib1g-dev libpcre2-dev libssl-dev编译nginx
maisi@ecs:~$ groupadd www
maisi@ecs:~$ useradd -g www www -s /sbin/nologin
maisi@ecs:~$ cd /usr/local/src && tar -zxvf nginx-1.24.0.tar.gz && cd nginx-1.24.0
maisi@ecs:/usr/local/src/nginx-1.24.0$ ./configure --prefix=/usr/local/nginx \
--with-http_stub_status_module \
--with-http_gzip_static_module \
--with-http_ssl_module \
--user=www --group=www
maisi@ecs:/usr/local/src/nginx-1.24.0$ make && sudo make install
nginx安装时依赖
pcre、openssl和zlib模块。使用apt-get安装依赖之后,则无需使用--with-pcre=、--with-openssl=和--with-zlib=指定模块源码路径。Ubuntu 26.04
root@ecs:~# cd /usr/local/src
root@ecs:/usr/local/src# tar -jxvf pcre-8.45.tar.bz2
root@ecs:/usr/local/src# tar -zxvf zlib-1.3.2.tar.gz
root@ecs:/usr/local/src# tar -zxvf openssl-3.5.7.tar.gz
root@ecs:/usr/local/src# groupadd www && useradd -g www www -s /sbin/nologin
root@ecs:/usr/local/src# tar -zxvf nginx-1.30.4.tar.gz && cd nginx-1.30.4
root@ecs:/usr/local/src/nginx-1.30.4# ./configure --prefix=/usr/local/nginx \
--with-http_ssl_module \
--with-http_stub_status_module \
--with-http_gzip_static_module \
--with-pcre=/usr/local/src/pcre-8.45 \
--with-zlib=/usr/local/src/zlib-1.3.2 \
--with-openssl=/usr/local/src/openssl-3.5.7 \
--user=www --group=www
root@ecs:/usr/local/src/nginx-1.30.4# make && make install
启动nginx
maisi@ecs:~$ sudo /usr/local/nginx/sbin/nginx查看进程
maisi@ecs:~$ ps -ef | grep nginx关闭nginx
maisi@ecs:~$ sudo /usr/local/nginx/sbin/nginx -s stop开启自启动
maisi@ecs:~$ cat > /etc/systemd/system/nginx.service <<EOF
[Unit]
Description=The nginx HTTP and reverse proxy server
After=network.target

[Service]
Type=forking
PIDFile=/usr/local/nginx/logs/nginx.pid
ExecStartPre=/usr/local/nginx/sbin/nginx -t
ExecStart=/usr/local/nginx/sbin/nginx
ExecReload=/usr/local/nginx/sbin/nginx -s reload
ExecStop=/usr/local/nginx/sbin/nginx -s quit

[Install]
WantedBy=multi-user.target
EOF
maisi@ecs:~$ chown root:root /etc/systemd/system/nginx.service
maisi@ecs:~$ chmod a+x /etc/systemd/system/nginx.service
maisi@ecs:~$ systemctl enable --now nginx
Windows
配置
模块
php安装与配置详解
CentOS 7.9
php-fpm 5.6.40
安装php
[root@ecs ~]# cd /usr/local/src && tar -jxvf freetype-2.4.0.tar.bz2 && cd freetype-2.4.0
[root@ecs freetype-2.4.0]# ./configure --prefix=/usr/local/freetype
[root@ecs freetype-2.4.0]# make && make install
[root@ecs freetype-2.4.0]# yum install -y bzip2 gcc libxml2-devel bzip2-devel curl-devel libjpeg-devel libpng-devel libmcrypt-devel php-gd
[root@ecs freetype-2.4.0]# cd /usr/local/src && tar -jxvf php-5.6.40.tar.bz2 && cd php-5.6.40
[root@ecs php-5.6.40]# ./configure --prefix=/usr/local/php \
--enable-fpm \
--with-mcrypt \
--enable-mbstring \
--disable-pdo \
--with-curl \
--disable-debug \
--disable-rpath \
--enable-inline-optimization \
--with-bz2 \
--with-zlib \
--enable-sockets \
--enable-sysvsem \
--enable-sysvshm \
--enable-pcntl \
--enable-mbregex \
--with-mhash \
--enable-zip \
--with-pcre-regex \
--with-mysql \
--with-mysqli \
--with-gd \
--with-jpeg-dir \
--with-freetype-dir=/usr/local/freetype
[root@ecs php-5.6.40]# make && make install
配置php
[root@ecs ~]# cd /usr/local/php/etc/
[root@ecs etc]# cp php-fpm.conf.default php-fpm.conf
[root@ecs etc]# sed -i -e '/^;pid =/c\pid = /usr/local/php/var/run/php-fpm.pid' \
-e '/^;daemonize =/c\daemonize = yes' \
-e '/^user =/c\user = www' \
-e '/^group =/c\group = www' \
-e '/^pm.max_children =/c\pm.max_children = 100' php-fpm.conf
开机自启动
[root@ecs ~]# cat > /usr/lib/systemd/system/php-fpm.service <<EOF
[Unit]
Description=The PHP FastCGI Process Manager
After=syslog.target network.target

[Service]
Type=simple
PIDFile=/usr/local/php/var/run/php-fpm.pid
EnvironmentFile=/usr/local/php/etc/php-fpm.conf
ExecStart=/usr/local/php/sbin/php-fpm --daemonize
ExecReload=/bin/kill -USR2 $MAINPID
PrivateTmp=true

[Install]
WantedBy=multi-user.target
EOF
[root@ecs ~]# systemctl daemon-reload
[root@ecs ~]# systemctl enable --now php-fpm
[root@ecs ~]# ps aux | grep php-fpm
添加到PATH
[root@ecs ~]# echo "export PATH=\$PATH:/usr/local/php/bin" >> /etc/profile
[root@ecs ~]# source /etc/profile
[root@ecs ~]# php -m
Ubuntu
ubuntu 24.04 php-fpm 5.6.40
缺少依赖的报错提示
依赖 报错 libxml2-dev configure: error: xml2-config not found. Please check your libxml2 installation libbz2-dev configure: error: Please reinstall the BZip2 distribution zlib1g-dev configure: error: Cannot find libz libcurl4-gnutls-dev configure: error: Please reinstall the libcurl distribution libcurl4-gnutls-dev与libcurl4-openssl-dev二选一,安装任意一个则会自动卸载另外一个。
GnuTLS是OpenSSL的一个分支,设计更现代化、更注重安全性和性能libjpeg-dev configure: error: jpeglib.h not found libpng-dev configure: error: png.h not found libmcrypt-dev configure: error: mcrypt.h not found. Please reinstall libmcrypt libfreetype-dev configure: error: freetype-config not found
/usr/local/src/php-5.6.40/ext/gd/gd.c:83:12: fatal error: ft2build.h: No such file or directoryopenssl-1.0.2u configure: error: Cannot find OpenSSL's <evp.h> libltdl-dev /usr/bin/ld: cannot find -lltdl: No such file or directory xutils-dev ../util/domd: 23: makedepend: not found 安装OpenSSL
OpenSSL从1.1.0开始,将EVP_PKEY设为opaque(不透明结构体),不再支持通过
pkey->pkey.dh等方式直接访问其成员。使用高版本的OpenSSL(如Ubuntu 24.04使用apt-get install libssl-dev安装的libssl-dev:amd64 (3.0.13-0ubuntu3.15))则会报错:error: invalid use of incomplete typedef ‘EVP_PKEY’ {aka ‘struct evp_pkey_st’}。root@ecs:~# apt install zlib1g-dev make xutils-dev gcc root@ecs:~# cd /usr/local/src && tar -zxvf openssl-1.0.2u.tar.gz && cd openssl-1.0.2u root@ecs:/usr/local/src/openssl-1.0.2u# ./config --prefix=/usr/local/openssl-1.0.2u -fPIC no-gost shared zlib root@ecs:/usr/local/src/openssl-1.0.2u# make depend && make install root@ecs:~# export LD_LIBRARY_PATH=/usr/local/openssl-1.0.2u/lib:$LD_LIBRARY_PATHmake depend依赖xutils-dev和gcc。shared:生成静态库(libssl.a等)的同时生成动态库(libssl.so等)-fPIC:生成位置无关(Position-Independent Code)的libssl.so。不同程序在调用libssl.so时,会将libssl.so加载到不同的内存地址才可以正常运行。如果不加-fPIC,libssl.so会因加载到相同的内存地址而报错。zlib:启用zlib压缩支持,依赖zlib1g-dev开发包。- 必须在LD_LIBRARY_PATH中指定openssl的lib路径,否则会报错:
error while loading shared libraries: libcrypto.so.1.0.0: cannot open shared object file: No such file or directory。
也可以下载libssl-dev_1.0.2g-1ubuntu4_amd64.deb(依赖libssl)进行安装:
root@ecs:~# apt-get install zlib1g-dev
root@ecs:~# wget https://launchpad.net/ubuntu/+archive/primary/+files/libssl1.0.0_1.0.2g-1ubuntu4_amd64.deb
root@ecs:~# dpkg -i libssl1.0.0_1.0.2g-1ubuntu4_amd64.deb
root@ecs:~# wget https://launchpad.net/ubuntu/+archive/primary/+files/libssl-dev_1.0.2g-1ubuntu4_amd64.deb
root@ecs:~# dpkg -i libssl-dev_1.0.2g-1ubuntu4_amd64.deb
安装libssl-dev_1.0.2g-1ubuntu4_amd64.deb有时会报错:
dpkg: dependency problems prevent configuration of libssl-dev:amd64:
 libssl-dev:amd64 depends on zlib1g-dev; however:
  Package zlib1g-dev is not installed.
使用
apt-get install zlib1g-dev安装zlib1g-dev,又会报错:The following packages have unmet dependencies: zlib1g-dev : Depends: zlib1g (= 1:1.3.dfsg-3.1ubuntu2.2) but 1:1.3.dfsg-3.1ubuntu2.1 is to be installed E: Unmet dependencies. Try 'apt --fix-broken install' with no packages (or specify a solution).再使用
apt-get install zlib1g=1:1.3.dfsg-3.1ubuntu2.2升级zlib1g,又会报错:The following packages have unmet dependencies: libssl-dev : Depends: zlib1g-dev but it is not going to be installed Recommends: libssl-doc but it is not going to be installed E: Unmet dependencies. Try 'apt --fix-broken install' with no packages (or specify a solution).升级
zlib1g要依赖libssl-dev,libssl-dev又依赖zlib1g-dev,而安装zlib1g-dev又必须升级zlib1g,死循环了。其实只需要卸载libssl-dev,然后再安装zlib1g-dev,依赖问题交由apt-get解决。root@ecs:~# dpkg -l | grep libssl | awk '{print $2,$3}' libssl-dev:amd64 1.0.2g-1ubuntu4 libssl1.0.0:amd64 1.0.2g-1ubuntu4 libssl3t64:amd64 3.0.13-0ubuntu3.15 root@ecs:~# dpkg -r libssl-dev:amd64安装完libssl1.0.0_1.0.2g-1ubuntu4_amd64.deb之后,
/usr/lib/x86_64-linux-gnu/目录会安装libssl.so(软链到libssl.so.1.0.0)、libssl.so.1.0.0、libcrypto.so(软链到libcrypto.so.1.0.0)和libcrypto.so.1.0.0。使用deb安装libssl-dev,一定要在最后安装,否则在安装libcurl4-gnutls-dev时,会自动升级libssl-dev到3.0.13-0ubuntu3.15。
root@ecs:~# apt-get install binutils
root@ecs:~# strings /usr/lib/x86_64-linux-gnu/libssl.so | grep -ioE '[0-9]+\.[0-9]+\.[0-9]+' | sort -V | tail -1
3.0.3
root@ecs:~# dpkg -l | grep libssl | awk '{print $2 $3}'
libssl-dev:amd643.0.13-0ubuntu3.15
libssl1.0.0:amd641.0.2g-1ubuntu4
libssl3t64:amd643.0.13-0ubuntu3.15
root@ecs:~# file /usr/lib/x86_64-linux-gnu/libssl.so
/usr/lib/x86_64-linux-gnu/libssl.so: symbolic link to libssl.so.3
此时编译php 5.6.40,虽然可以找到
evp.h和libssl.so,但libssl.so.3与php 5.6.40是不兼容的,依旧会报错:error: invalid use of incomplete typedef ‘EVP_PKEY’ {aka ‘struct evp_pkey_st’}。其它安装包下载地址:https://launchpad.net/ubuntu/+source/openssl/
查看历史版本:https://changelogs.ubuntu.com/changelogs/pool/main/o/openssl/openssl_3.0.13-0ubuntu3.4/changelog
查看已安装libssl-dev
root@ecs:~# apt-get install apt-show-versions
root@ecs:~# apt-show-versions libssl-dev
卸载libssl
root@ecs:~# dpkg -l | grep libssl
root@ecs:~# dpkg -r libssl-dev:amd64
root@ecs:~# dpkg --purge libssl1.0.0:amd64
安装libfreetype-dev
apt-get安装的libfreetype-dev版本为2.13.2+dfsg-1ubuntu0.1,而freetype从2.10.1开始不再安装freetype-config,改用pkg-config来管理CFLAGS和库。
http://changelogs.ubuntu.com/changelogs/pool/main/f/freetype/freetype_2.10.1-2/changelog
* New upstream release (Closes: #901052):
- Avoid dereferencing a NULL pointer (CVE-2018-6942) (Closes: #890450).
- The `freetype-config' script is no longer installed by default
(Closes: #871470, #886461). All packages depending on libfreetype6-dev
should use pkg-config to find the relevant CFLAGS and libraries.使用
pkg-config freetype2 --cflags,php会自动查找freetype2的头文件位置(/usr/include/freetype2)。root@ecs:~# apt-get install libfreetype-dev pkg-config root@ecs:~# cat > /usr/local/bin/freetype-config << EOF #!/bin/bash pkg-config freetype2 "\$@" EOF root@ecs:~# chmod a+x /usr/local/bin/freetype-config root@ecs:~# freetype-config --cflags -I/usr/include/freetype2 -I/usr/include/libpng16 root@ecs:~# freetype-config --libs -lfreetype安装php(完整脚本)
root@ecs:~# apt-get update root@ecs:~# apt install zlib1g-dev make xutils-dev gcc root@ecs:~# cd /usr/local/src && tar -zxvf openssl-1.0.2u.tar.gz && cd openssl-1.0.2u root@ecs:/usr/local/src/openssl-1.0.2u# ./config --prefix=/usr/local/openssl-1.0.2u -fPIC no-gost shared zlib root@ecs:/usr/local/src/openssl-1.0.2u# make depend && make install root@ecs:~# export LD_LIBRARY_PATH=/usr/local/openssl-1.0.2u/lib:$LD_LIBRARY_PATH root@ecs:~# apt-get install pkg-config libfreetype-dev root@ecs:~# cat > /usr/local/bin/freetype-config << EOF #!/bin/bash pkg-config freetype2 "\$@" EOF root@ecs:~# chmod a+x /usr/local/bin/freetype-config root@ecs:~# apt-get install libxml2-dev libbz2-dev libcurl4-gnutls-dev libjpeg-dev libpng-dev libmcrypt-dev libltdl-dev bzip2 root@ecs:~# ln -s /usr/include/x86_64-linux-gnu/curl/ /usr/local/include/ root@ecs:~# cd /usr/local/src && tar -jxvf php-5.6.40.tar.bz2 && cd php-5.6.40 root@ecs:/usr/local/src/php-5.6.40# ./configure --prefix=/usr/local/php \ --enable-fpm \ --with-mcrypt \ --enable-mbstring \ --disable-pdo \ --with-curl \ --disable-debug \ --disable-rpath \ --enable-inline-optimization \ --with-bz2 \ --with-zlib \ --enable-sockets \ --enable-sysvsem \ --enable-sysvshm \ --enable-pcntl \ --enable-mbregex \ --with-mhash \ --enable-zip \ --with-pcre-regex \ --with-mysql \ --with-mysqli \ --with-gd \ --with-jpeg-dir \ --with-freetype-dir \ --with-iconv \ --with-openssl=/usr/local/openssl-1.0.2u root@ecs:/usr/local/src/php-5.6.40# make && make installphp-fpm是独立的,可以搭配nginx使用。--with-iconv使用glibc内置的iconv。--with-openssl如果不指定openssl的头文件路径,则必须安装pkg-config来自动获取include和lib路径。
编译安装openssl时,既可以在--with-openssl后面指定openssl的安装路径,又可以使用export PKG_CONFIG_PATH=/usr/local/openssl-1.0.2u/lib64/pkgconfig:$PKG_CONFIG_PATH,pkg-config会到PKG_CONFIG_PATH配置的目录读取openssl.pc并获取openssl的头文件和库文件路径。
ubuntu 26.04 php-fpm 5.6.40
Ubuntu 26.04的libxml2-dev版本是2.15.2+dfsg-0.1ubuntu0.1,新版libxml2部分函数不再兼容php 5.6.40,因此必须安装低版本的libxml2-dev。
root@ecs:~# wget https://archive.ubuntu.com/ubuntu/pool/main/i/icu/libicu74_74.2-1ubuntu3.1_amd64.deb
root@ecs:~# wget https://archive.ubuntu.com/ubuntu/pool/main/i/icu/icu-devtools_74.2-1ubuntu3.1_amd64.deb
root@ecs:~# wget https://archive.ubuntu.com/ubuntu/pool/main/i/icu/libicu-dev_74.2-1ubuntu3.1_amd64.deb
root@ecs:~# wget https://archive.ubuntu.com/ubuntu/pool/main/libx/libxml2/libxml2_2.9.14+dfsg-1.3ubuntu3.8_amd64.deb
root@ecs:~# wget http://archive.ubuntu.com/ubuntu/pool/main/libx/libxml2/libxml2-dev_2.9.14+dfsg-1.3ubuntu3.8_amd64.deb
root@ecs:~# dpkg -i libicu74_74.2-1ubuntu3.1_amd64.deb
root@ecs:~# dpkg -i icu-devtools_74.2-1ubuntu3.1_amd64.deb
root@ecs:~# dpkg -i libicu-dev_74.2-1ubuntu3.1_amd64.deb
root@ecs:~# dpkg -i libxml2_2.9.14+dfsg-1.3ubuntu3.8_amd64.deb
root@ecs:~# dpkg -i libxml2-dev_2.9.14+dfsg-1.3ubuntu3.8_amd64.deb- libxml2:amd64 depends on libicu74 (>= 74.1-1~);
- libicu-dev:amd64 depends on icu-devtools (>= 74.2-1ubuntu3.1);
其余步骤和ubuntu 24.04 php-fpm 5.6.40完全一致。
php 5.6.40
安装依赖
root@ecs:~# apt-get install libxml2-dev zlib1g-dev libcurl4-gnutls-dev libjpeg-dev libpng-dev libfreetype-dev
root@ecs:~# ln -s /usr/include/x86_64-linux-gnu/curl /usr/include/curl
root@ecs:~# cd /usr/local/src && tar -zxvf libmcrypt-2.5.8.tar.gz && cd libmcrypt-2.5.8
root@ecs:/usr/local/src/libmcrypt-2.5.8# ./configure --prefix=/usr/local/libmcrypt
root@ecs:/usr/local/src/libmcrypt-2.5.8# make && make install
root@ecs:/usr/local/src/libmcrypt-2.5.8# cd /usr/local/src && tar -zxvf libiconv-1.14.tar.gz && cd libiconv-1.14
root@ecs:/usr/local/src/libiconv-1.14# ./configure --prefix=/usr/local/libiconv
root@ecs:/usr/local/src/libiconv-1.14# make && make install
安装php
root@ecs:~# cd /usr/local/src && tar -jxvf php-5.6.40.tar.bz2 && cd php-5.6.40
root@ecs:/usr/local/src/php-5.6.40# apt-get install pkg-config autoconf
root@ecs:/usr/local/src/php-5.6.40# sed -i "s/freetype-config/pkg-config/g" ./ext/gd/config.m4
root@ecs:/usr/local/src/php-5.6.40# sed -i "s/FREETYPE2_CONFIG --cflags/FREETYPE2_CONFIG freetype2 --cflags/g" ./ext/gd/config.m4
root@ecs:/usr/local/src/php-5.6.40# sed -i "s/FREETYPE2_CONFIG --libs/FREETYPE2_CONFIG freetype2 --libs/g" ./ext/gd/config.m4
root@ecs:/usr/local/src/php-5.6.40# ./buildconf --force
root@ecs:/usr/local/src/php-5.6.40# ./configure --prefix=/usr/local/php \
--with-apxs2=/usr/local/apache/bin/apxs \
--with-mysql \
--with-mysqli \
--with-pdo-mysql \
--enable-calendar \
--enable-exif \
--enable-ftp \
--with-gd \
--with-jpeg-dir \
--with-png-dir \
--with-zlib-dir \
--with-freetype-dir \
--enable-gd-native-ttf \
--enable-mbstring \
--enable-bcmath \
--with-curl \
--with-openssl=/usr/local/openssl \
--enable-soap \
--enable-zip \
--with-config-file-path=/usr/local/php/lib \
--with-mcrypt=/usr/local/libmcrypt \
--with-iconv-dir=/usr/local/libiconv
root@ecs:/usr/local/src/php-5.6.40# make && make install
注:
- 安装apache时已经安装了openssl,
--with-openssl指定openssl的安装路径/usr/local/openssl。 --with-iconv-dir=指定GNU libiconv的安装路径。- freetype 2.10.1开始不再安装freetype-config,而是使用pkg-config来管理CFLAGS和库。需要修改
./ext/gd/config.m4中freetype-config为pkg-config,否则会报错:configure: error: freetype-config not found.。
apache添加php扩展
root@ecs:~# echo "AddType application/x-httpd-php .php" >> /usr/local/apache/conf/httpd.conf root@ecs:~# systemctl restart httpd root@ecs:~# cat >> /usr/local/apache/htdocs/index.php << EOF <?php phpinfo(); EOF- 安装apache时已经安装了openssl,
配置php
root@ecs:~# cp -f php.ini-development /usr/local/php/lib/php.ini
root@ecs:~# sed -i '/^;date.timezone =/cdate.timezone = "Asia/Shanghai"' /usr/local/php/lib/php.ini
root@ecs:~# sed -i '/^expose_php = On/cexpose_php = Off' /usr/local/php/lib/php.ini
root@ecs:~# sed -i "s/^;session.save_path/session.save_path/" /usr/local/php/lib/php.ini
root@ecs:~# chmod -R 777 /tmp
Docker
php 5.6.40
部署容器
[root@ecs ~]# docker run --name php-fpm \
-e TZ=Asia/Shanghai \
-v /data/wwwroot:/data/wwwroot \
-v /tmp:/tmp \
-p 9000:9000 \
--privileged=true --restart=always \
-d php:5.6.40-fpm
统一用户
[root@ecs ~]# cat /etc/passwd | grep www
[root@ecs ~]# docker exec -it php-fpm /bin/sh
# groupadd www
# useradd -g www -s /sbin/nologin www
# usermod -u 1000 www && groupmod -g 1000 www
# sed -i -e '/user =/a \user = www' \
-e '/group =/a \group = www' \
/usr/local/etc/php-fpm.d/www.conf
通过ID让宿主机的www用户和php-fpm容器内的www用户识别为同一个用户。
php-fpm进程的默认用户为www-data,而宿主机的网站用户为www,这2个用户不一致则要求给文件或文件夹设置权限时必须设置其他用户(ugo中的o)权限。宿主机的www用户id为1000,容器内www-data用户id为33,如果直接修改www-data的用户id为1000则会报错:
usermod: user www-data is currently used by process 7,而如果关闭php-fpm进程则会自动退出容器,因此可以在容器内新建www组和www用户,并设置php-fpm进程的用户和组为www。安装mysqli扩展
[root@ecs ~]# docker exec -it php-fpm /bin/sh
# ln -snf /usr/share/zoneinfo/Asia/Shanghai /etc/localtime \
&& echo "Asia/Shanghai" > /etc/timezone
# cat > /etc/apt/sources.list << EOF
deb [trusted=yes] http://mirrors.aliyun.com/debian-archive/debian/ stretch main contrib non-free
deb [trusted=yes] http://mirrors.aliyun.com/debian-archive/debian-security/ stretch/updates main contrib non-free
EOF
# apt-get update \
&& apt-get -y --no-install-recommends install \
zlib1g-dev libfreetype6-dev libjpeg62-turbo-dev libpng-dev \
&& docker-php-ext-configure gd \
--with-freetype-dir=/usr --with-jpeg-dir=/usr --with-png-dir=/usr \
&& docker-php-ext-install -j$(nproc) bcmath gd pcntl opcache \
mysqli pdo pdo_mysql
php 5.6.40-fpm基于debian stretch(debian 9),目前已经EOL,
/etc/apt/sources.list需要使用Debian过期源地址。
php 7.4
部署容器
[root@ecs ~]# docker run --name php-fpm \ -e TZ=Asia/Shanghai \ -v /data/wwwroot:/data/wwwroot \ -v /tmp:/tmp \ -v /var/run/docker.sock:/var/run/docker.sock \ -v /usr/bin/docker:/usr/bin/docker \ -p 9000:9000 \ --privileged=true --restart=always \ -d maisi/php:7.4-fpm/usr/bin/docker:/usr/bin/docker非必须,但如果php需要调用docker程序,则必须设置docker映射。yum install docker方式安装的docker最高版本为:1.13.1,使用-v /usr/bin/docker:/usr/bin/docker,在容器中执行docker命令会报错:Can't open /etc/sysconfig/docker,必须完全卸载后再安装高版本的docker-ce。
安装mysqli扩展
[root@ecs ~]# docker exec -it php-fpm /bin/sh
# ln -snf /usr/share/zoneinfo/Asia/Shanghai /etc/localtime \
&& echo "Asia/Shanghai" > /etc/timezone
# sed -i 's/deb.debian.org/mirrors.aliyun.com/;s/security.debian.org/mirrors.aliyun.com/g' /etc/apt/sources.list
# apt-get update \
&& apt-get -y --no-install-recommends install \
cron rsyslog supervisor \
zlib1g-dev libpng-dev libzip-dev \
&& docker-php-ext-configure gd \
&& docker-php-ext-install -j$(nproc) bcmath gd pcntl opcache zip \
mysqli pdo pdo_mysql
Ubuntu防火墙管理:ufw安装与配置
查看防火墙状态
root@ecs:~# ufw status
Status: inactive
开启防火墙
root@ecs:~# ufw enable
Command may disrupt existing ssh connections. Proceed with operation (y|n)? y
Firewall is active and enabled on system startup
关闭防火墙
root@ecs:~# ufw disable
Firewall stopped and disabled on system startup
查看防火墙版本
root@ecs:~# ufw version
ufw 0.36.1
Copyright 2008-2021 Canonical Ltd.
允许外部访问
root@ecs:~# ufw default allow
Default incoming policy changed to 'allow'
(be sure to update your rules accordingly)
拒绝外部访问
root@ecs:~# ufw default deny
Default incoming policy changed to 'deny'
(be sure to update your rules accordingly)
允许外部访问80端口
root@ecs:~# ufw allow 80
Rule added
Rule added (v6)
拒绝外部访问80端口
root@ecs:~# ufw deny 80
Rule updated
Rule updated (v6)
允许指定IP访问本机所有端口
root@ecs:~# ufw allow from 192.168.1.9
Rule added